


3Dprinting (178) A.I. (835) animation (349) blender (207) colour (233) commercials (52) composition (152) cool (363) design (648) Featured (79) hardware (313) IOS (109) jokes (138) lighting (288) modeling (144) music (186) photogrammetry (190) photography (754) production (1289) python (92) quotes (496) reference (314) software (1350) trailers (306) ves (550) VR (221)
nofilmschool.com/types-of-film-lights
“Not every light performs the same way. Lights and lighting are tricky to handle. You have to plan for every circumstance. But the good news is, lighting can be adjusted. Let’s look at different factors that affect lighting in every scene you shoot. ”
Use CRI, Luminous Efficacy and color temperature controls to match your needs.
Color Temperature
Color temperature describes the “color” of white light by a light source radiated by a perfect black body at a given temperature measured in degrees Kelvin
https://www.pixelsham.com/2019/10/18/color-temperature/
CRI
“The Color Rendering Index is a measurement of how faithfully a light source reveals the colors of whatever it illuminates, it describes the ability of a light source to reveal the color of an object, as compared to the color a natural light source would provide. The highest possible CRI is 100. A CRI of 100 generally refers to a perfect black body, like a tungsten light source or the sun. ”
https://www.studiobinder.com/blog/what-is-color-rendering-index/
https://en.wikipedia.org/wiki/Color_rendering_index
| Light source | CCT (K) | CRI |
|---|---|---|
| Low-pressure sodium (LPS/SOX) | 1800 | −44 |
| Clear mercury-vapor | 6410 | 17 |
| High-pressure sodium (HPS/SON) | 2100 | 24 |
| Coated mercury-vapor | 3600 | 49 |
| Halophosphate warm-white fluorescent | 2940 | 51 |
| Halophosphate cool-white fluorescent | 4230 | 64 |
| Tri-phosphor warm-white fluorescent | 2940 | 73 |
| Halophosphate cool-daylight fluorescent | 6430 | 76 |
| “White” SON | 2700 | 82 |
| Standard LED Lamp | 2700–5000 | 83 |
| Quartz metal halide | 4200 | 85 |
| Tri-phosphor cool-white fluorescent | 4080 | 89 |
| High-CRI LED lamp (blue LED) | 2700–5000 | 95 |
| Ceramic discharge metal-halide lamp | 5400 | 96 |
| Ultra-high-CRI LED lamp (violet LED) | 2700–5000 | 99 |
| Incandescent/halogen bulb | 3200 | 100 |
Luminous Efficacy
Luminous efficacy is a measure of how well a light source produces visible light, watts out versus watts in, measured in lumens per watt. In other words it is a measurement that indicates the ability of a light source to emit visible light using a given amount of power. It is a ratio of the visible energy to the power that goes into the bulb.
FILM LIGHT TYPES
Consumer light types
Tungsten Lights
Light interiors and match domestic places or office locations. Daylight.
Advantages of Tungsten Lights
Almost perfect color rendition
Low cost
Does not use mercury like CFLs (fluorescent) or mercury vapor lights
Better color temperature than standard tungsten
Longer life than a conventional incandescent
Instant on to full brightness, no warm-up time, and it is dimmable
Disadvantages of Tungsten Lights
Extremely hot
High power requirement
The lamp is sensitive to oils and cannot be touched
The bulb is capable of blowing and sending hot glass shards outward. A screen or layer of glass on the outside of the lamp can protect users.
Hydrargyrum medium-arc iodide lights
HMI’s are used when high output is required. They are also used to recreate sun shining through windows or to fake additional sun while shooting exteriors. HMIs can light huge areas at once.
Advantages of HMI lights
High light output
Higher efficiency
High color temperature
Disadvantages of HMI lights:
High cost
High power requirement
Dims only to about 50%
the color temperature increases with dimming
HMI bulbs will explode is dropped and release toxic chemicals
Fluorescent
Fluorescent film lighting is achieved by laying multiple tubes next to each other, combining as many as you want for the desired brightness. The good news is you can choose your bulbs to either be warm or cool depending on the scenario you’re shooting. You want to get these bulbs close to the subject because they’re not great at opening up spaces. Fluorescent lighting is used to light interiors and is more compact and cooler than tungsten or HMI lighting.
Advantages of Fluorescent lights
High efficiency
Low power requirement
Low cost
Long lamp life
Cool
Capable of soft even lighting over a large area
Lightweight
Disadvantages of Fluorescent lights
Flicker
High CRI
Domestic tubes have low CRI & poor color rendition.
LED
LED’s are more and more common on film sets. You can use batteries to power them. That makes them portable and sleek – no messy cabled needed. You can rig your own panels of LED lights to fit any space necessary as well. LED’s can also power Fresnel style lamp heads such as the Arri L-series.
Advantages of LED light
Soft, even lighting
Pure light without UV-artifacts
High efficiency
Low power consumption, can be battery powered
Excellent dimming by means of pulse width modulation control
Long lifespan
Environmentally friendly
Insensitive to shock
No risk of explosion
Disadvantages of LED light
High cost.
LED’s are currently still expensive for their total light output
– Valve is currently working on an open-source BCI software project, to interpret the signals being read from people’s brains using VR headsets.
– “If you’re a software developer in 2022 who doesn’t have one of these in your test lab, you’re making a silly mistake,”
– “The real world will seem flat, colourless, blurry compared to the experiences you’ll be able to create in people’s brains.”
– “BCIs have advanced to a point where that (VR) vertigo could be suppressed artificially, and that “it’s more of a certification issue than a scientific one”.
– Neuroplasticity is the ability of our brains to re-learn how to operate the body when something changes.
– “You can iterate software faster than a prosthetic”
www.andreageremia.it/tutorial_python_tcl.html
https://www.gatimedia.co.uk/list-of-knobs-2

https://learn.foundry.com/nuke/developers/63/ndkdevguide/knobs-and-handles/knobtypes.html
http://www.andreageremia.it/tutorial_python_tcl.html
http://thoughtvfx.blogspot.com/2012/12/nuke-tcl-tips.html
Check final image quality
https://www.compositingpro.com/tech-check-compositing-shot-in-nuke/
Local copy:
http://pixelsham.com/wp-content/uploads/2023/03/compositing_pro_tech_check_nuke_script.nk
Nuke tcl procedures
https://www.gatimedia.co.uk/nuke-tcl-procedures
Knobs
https://learn.foundry.com/nuke/developers/63/ndkdevguide/knobs-and-handles/knobtypes.html
(more…)
www.xuanprada.com/blog/2014/11/3/hdri-shooting
http://blog.gregzaal.com/2016/03/16/make-your-own-hdri/
http://blog.hdrihaven.com/how-to-create-high-quality-hdri/
Shooting checklist
Methodology
Exposures starting point
NOTE: The goal is to clean the initial individual brackets before or at merging time as much as possible.
This means:

Here are the tips for using the chromatic ball in VFX projects, written in English:
https://www.linkedin.com/posts/bellrodrigo_here-are-the-tips-for-using-the-chromatic-activity-7200950595438940160-AGBp
Tips for Using the Chromatic Ball in VFX Projects**
The chromatic ball is an invaluable tool in VFX work, helping to capture lighting and reflection data crucial for integrating CGI elements seamlessly. Here are some tips to maximize its effectiveness:
1. **Positioning**:
– Place the chromatic ball in the same lighting conditions as the main subject. Ensure it is visible in the camera frame but not obstructing the main action.
– Ideally, place the ball where the CGI elements will be integrated to match the lighting and reflections accurately.
2. **Recording Reference Footage**:
– Capture reference footage of the chromatic ball at the beginning and end of each scene or lighting setup. This ensures you have consistent lighting data for the entire shoot.
3. **Consistent Angles**:
– Use consistent camera angles and heights when recording the chromatic ball. This helps in comparing and matching lighting setups across different shots.
4. **Combine with a Gray Ball**:
– Use a gray ball alongside the chromatic ball. The gray ball provides a neutral reference for exposure and color balance, complementing the chromatic ball’s reflection data.
5. **Marking Positions**:
– Mark the position of the chromatic ball on the set to ensure consistency when shooting multiple takes or different camera angles.
6. **Lighting Analysis**:
– Analyze the chromatic ball footage to understand the light sources, intensity, direction, and color temperature. This information is crucial for creating realistic CGI lighting and shadows.
7. **Reflection Analysis**:
– Use the chromatic ball to capture the environment’s reflections. This helps in accurately reflecting the CGI elements within the same scene, making them blend seamlessly.
8. **Use HDRI**:
– Capture High Dynamic Range Imagery (HDRI) of the chromatic ball. HDRI provides detailed lighting information and can be used to light CGI scenes with greater realism.
9. **Communication with VFX Team**:
– Ensure that the VFX team is aware of the chromatic ball’s data and how it was captured. Clear communication ensures that the data is used effectively in post-production.
10. **Post-Production Adjustments**:
– In post-production, use the chromatic ball data to adjust the CGI elements’ lighting and reflections. This ensures that the final output is visually cohesive and realistic.
Also see: https://www.pixelsham.com/2015/05/16/how-aperture-shutter-speed-and-iso-affect-your-photos/
In photography, exposure value (EV) is a number that represents a combination of a camera’s shutter speed and f-number, such that all combinations that yield the same exposure have the same EV (for any fixed scene luminance).
The EV concept was developed in an attempt to simplify choosing among combinations of equivalent camera settings. Although all camera settings with the same EV nominally give the same exposure, they do not necessarily give the same picture. EV is also used to indicate an interval on the photographic exposure scale. 1 EV corresponding to a standard power-of-2 exposure step, commonly referred to as a stop
EV 0 corresponds to an exposure time of 1 sec and a relative aperture of f/1.0. If the EV is known, it can be used to select combinations of exposure time and f-number.
Note EV does not equal to photographic exposure. Photographic Exposure is defined as how much light hits the camera’s sensor. It depends on the camera settings mainly aperture and shutter speed. Exposure value (known as EV) is a number that represents the exposure setting of the camera.
Thus, strictly, EV is not a measure of luminance (indirect or reflected exposure) or illuminance (incidental exposure); rather, an EV corresponds to a luminance (or illuminance) for which a camera with a given ISO speed would use the indicated EV to obtain the nominally correct exposure. Nonetheless, it is common practice among photographic equipment manufacturers to express luminance in EV for ISO 100 speed, as when specifying metering range or autofocus sensitivity.
The exposure depends on two things: how much light gets through the lenses to the camera’s sensor and for how long the sensor is exposed. The former is a function of the aperture value while the latter is a function of the shutter speed. Exposure value is a number that represents this potential amount of light that could hit the sensor. It is important to understand that exposure value is a measure of how exposed the sensor is to light and not a measure of how much light actually hits the sensor. The exposure value is independent of how lit the scene is. For example a pair of aperture value and shutter speed represents the same exposure value both if the camera is used during a very bright day or during a dark night.
Each exposure value number represents all the possible shutter and aperture settings that result in the same exposure. Although the exposure value is the same for different combinations of aperture values and shutter speeds the resulting photo can be very different (the aperture controls the depth of field while shutter speed controls how much motion is captured).
EV 0.0 is defined as the exposure when setting the aperture to f-number 1.0 and the shutter speed to 1 second. All other exposure values are relative to that number. Exposure values are on a base two logarithmic scale. This means that every single step of EV – plus or minus 1 – represents the exposure (actual light that hits the sensor) being halved or doubled.
https://www.streetdirectory.com/travel_guide/141307/photography/exposure_value_ev_and_exposure_compensation.html
https://en.wikipedia.org/wiki/Exposure_value
https://www.scantips.com/lights/math.html
![]()
which means 2EV = N² / t
where
EV 0 corresponds to an exposure time of 1 sec and an aperture of f/1.0.
Example: If f/16 and 1/4 second, then this is:
(N² / t) = (16 × 16 ÷ 1/4) = (16 × 16 × 4) = 1024.
Log₂(1024) is EV 10. Meaning, 210 = 1024.
The exposure meter in the camera does not know whether the subject itself is bright or not. It simply measures the amount of light that comes in, and makes a guess based on that. The camera will aim for 18% gray, meaning if you take a photo of an entirely white surface, and an entirely black surface you should get two identical images which both are gray (at least in theory)
https://en.wikipedia.org/wiki/Light_meter
For reflected-light meters, camera settings are related to ISO speed and subject luminance by the reflected-light exposure equation:
![]()
where
For incident-light meters, camera settings are related to ISO speed and subject illuminance by the incident-light exposure equation:
![]()
where
Two values for K are in common use: 12.5 (Canon, Nikon, and Sekonic) and 14 (Minolta, Kenko, and Pentax); the difference between the two values is approximately 1/6 EV.
For C a value of 250 is commonly used.
Nonetheless, it is common practice among photographic equipment manufacturers to also express luminance in EV for ISO 100 speed. Using K = 12.5, the relationship between EV at ISO 100 and luminance L is then :
L = 2(EV-3)
The situation with incident-light meters is more complicated than that for reflected-light meters, because the calibration constant C depends on the sensor type. Illuminance is measured with a flat sensor; a typical value for C is 250 with illuminance in lux. Using C = 250, the relationship between EV at ISO 100 and illuminance E is then :
E = 2.5 * 2(EV)
https://nofilmschool.com/2018/03/want-easier-and-faster-way-calculate-exposure-formula
Three basic factors go into the exposure formula itself instead: aperture, shutter, and ISO. Plus a light meter calibration constant.
f-stop²/shutter (in seconds) = lux * ISO/C
If you at least know four of those variables, you’ll be able to calculate the missing value.
So, say you want to figure out how much light you’re going to need in order to shoot at a certain f-stop. Well, all you do is plug in your values (you should know the f-stop, ISO, and your light meter calibration constant) into the formula below:
lux = C (f-stop²/shutter (in seconds))/ISO
Exposure Value Calculator:
https://snapheadshots.com/resources/exposure-and-light-calculator
https://www.scantips.com/lights/exposurecalc.html
https://www.pointsinfocus.com/tools/exposure-settings-ev-calculator/#google_vignette
From that perspective, an exposure stop is a measurement of Exposure and provides a universal linear scale to measure the increase and decrease in light, exposed to the image sensor, due to changes in shutter speed, iso & f-stop.
+-1 stop is a doubling or halving of the amount of light let in when taking a photo.
1 EV is just another way to say one stop of exposure change.
One major use of EV (Exposure Value) is just to measure any change of exposure, where one EV implies a change of one stop of exposure. Like when we compensate our picture in the camera.
If the picture comes out too dark, our manual exposure could correct the next one by directly adjusting one of the three exposure controls (f/stop, shutter speed, or ISO). Or if using camera automation, the camera meter is controlling it, but we might apply +1 EV exposure compensation (or +1 EV flash compensation) to make the result goal brighter, as desired. This use of 1 EV is just another way to say one stop of exposure change.
On a perfect day the difference from sampling the sky vs the sun exposure with diffusing spot meters is about 3.2 exposure difference.
 ~15.4 EV for the sun
 ~12.2 EV for the sky
That is as a ballpark. All still influenced by surroundings, accuracy parameters, fov of the sensor…
EV calculator
https://www.scantips.com/lights/evchart.html#calc
http://www.fredparker.com/ultexp1.htm
Exposure value is basically used to indicate an interval on the photographic exposure scale, with a difference of 1 EV corresponding to a standard power-of-2 exposure step, also commonly referred to as a “stop”.
https://contrastly.com/a-guide-to-understanding-exposure-value-ev/
All you can hope to measure with your camera and some images is the relative reflected luminance. Even if you have the camera settings. https://en.wikipedia.org/wiki/Relative_luminance
If you REALLY want to know the amount of light in absolute radiometric units, you’re going to need to use some kind of absolute light meter or measured light source to calibrate your camera. For references on how to do this, see: Section 2.5 Obtaining Absolute Radiance from http://www.pauldebevec.com/Research/HDR/debevec-siggraph97.pdf
IF you are still trying to gauge relative brightness, the level of the sun in Nuke can vary, but it should be in the thousands. Ie: between 30,000 and 65,0000 rgb value depending on time of the day, season and atmospherics.
The values for a 12 o’clock sun, with the sun sampled at EV 15.5 (shutter 1/30, ISO 100, F22) is 32.000 RGB max values (or 32,000 pixel luminance).
The thing to keep an eye for is the level of contrast between sunny side/fill side. The terminator should be quite obvious, there can be up to 3 stops difference between fill/key in sunny lit objects.
Note: In Foundry’s Nuke, the software will map 18% gray to whatever your center f/stop is set to in the viewer settings (f/8 by default… change that to EV by following the instructions below).
You can experiment with this by attaching an Exposure node to a Constant set to 0.18, setting your viewer read-out to Spotmeter, and adjusting the stops in the node up and down. You will see that a full stop up or down will give you the respective next value on the aperture scale (f8, f11, f16 etc.).
One stop doubles or halves the amount or light that hits the filmback/ccd, so everything works in powers of 2.
So starting with 0.18 in your constant, you will see that raising it by a stop will give you .36 as a floating point number (in linear space), while your f/stop will be f/11 and so on.
If you set your center stop to 0 (see below) you will get a relative readout in EVs, where EV 0 again equals 18% constant gray.
Note: make sure to set your Nuke read node to ‘raw data’
In other words. Setting the center f-stop to 0 means that in a neutral plate, the middle gray in the macbeth chart will equal to exposure value 0. EV 0 corresponds to an exposure time of 1 sec and an aperture of f/1.0.
To switch Foundry’s Nuke’s SpotMeter to return the EV of an image, click on the main viewport, and then press s, this opens the viewer’s properties. Now set the center f-stop to 0 in there. And the SpotMeter in the viewport will change from aperture and fstops to EV.
If you are trying to gauge the EV from the pixel luminance in the image:
– Setting the center f-stop to 0 means that in a neutral plate, the middle 18% gray will equal to exposure value 0.
– So if EV 0 = 0.18 middle gray in nuke which equal to a pixel luminance of 0.18, doubling that value, doubles the EV.
.18 pixel luminance = 0EV
.36 pixel luminance = 1EV
.72 pixel luminance = 2EV
1.46 pixel luminance = 3EV
...
This is a Geometric Progression function: xn = ar(n-1)
The most basic example of this function is 1,2,4,8,16,32,… The sequence starts at 1 and doubles each time, so
And we get:
{a, ar, ar2, ar3, … }
= {1, 1×2, 1×22, 1×23, … }
= {1, 2, 4, 8, … }
In this example the function translates to: n = 2(n-1)
You can graph this curve through this expression: x = 2(y-1) :
![]()
You can go back and forth between the two values through a geometric progression function and a log function:
(Note: in a spreadsheet this is: = POWER(2; cell# -1) and =LOG(cell#, 2)+1) )
| 2(y-1) | log2(x)+1 |
| x | y |
| 1 | 1 |
| 2 | 2 |
| 4 | 3 |
| 8 | 4 |
| 16 | 5 |
| 32 | 6 |
| 64 | 7 |
| 128 | 8 |
| 256 | 9 |
| 512 | 10 |
| 1024 | 11 |
| 2048 | 12 |
| 4096 | 13 |
Translating this into a geometric progression between an image pixel luminance and EV:
www.awn.com/news/autodesk-shotgun-taps-new-tech-future-production-management
With Autodesk’s acquisition of technology known as Consilium, machine learning-driven generative scheduling is coming to Shotgun Software, which will enable more accurate bidding, scheduling, and resource planning decisions.
Machine learning is being brought to production management with generative scheduling in Shotgun, currently in early testing. For producers and production managers, this will make the manual and complex challenge of optimized scheduling and resource planning more dynamic, controllable, and predictive. This feature set will allow producers to plan faster, with greater accuracy and agility to help their teams produce the best work possible.
VIM is a real-time 3D file format purpose built for AEC’s modern demands.
VIM offers a modern, efficient, and compact 3D data interchange open format to quickly transport design data and geometry from Revit and other BIM sources such as real-time engines and 3D editors.
Blockly is a client-side library for the programming language JavaScript for creating block-based visual programming languages (VPLs) and editors. It is a project of Google and is free and open-source software released under the Apache License 2.0.
developers.google.com/blockly/guides/overview
https://www.translatorscafe.com/unit-converter/en-US/illumination/1-11/
The power output of a light source is measured using the unit of watts W. This is a direct measure to calculate how much power the light is going to drain from your socket and it is not relatable to the light brightness itself.
The amount of energy emitted from it per second. That energy comes out in a form of photons which we can crudely represent with rays of light coming out of the source. The higher the power the more rays emitted from the source in a unit of time.
Not all energy emitted is visible to the human eye, so we often rely on photometric measurements, which takes in account the sensitivity of human eye to different wavelenghts
Details in the post
(more…)
You’ve been in the VFX Industry for over a decade. Tell us about your journey.
It all started with my older brother giving me a Commodore64 personal computer as a gift back in the late 80′. I realised then I could create something directly from my imagination using this new digital media format. And, eventually, make a living in the process.
That led me to start my professional career in 1990. From live TV to games to animation. All the way to live action VFX in the recent years.
I really never stopped to crave to create art since those early days. And I have been incredibly fortunate to work with really great talent along the way, which made my journey so much more effective.
What inspired you to pursue VFX as a career?
An incredible combination of opportunities, really. The opportunity to express myself as an artist and earn money in the process. The opportunity to learn about how the world around us works and how best solve problems. The opportunity to share my time with other talented people with similar passions. The opportunity to grow and adapt to new challenges. The opportunity to develop something that was never done before. A perfect storm of creativity that fed my continuous curiosity about life and genuinely drove my inspiration.
Tell us about the projects you’ve particularly enjoyed working on in your career
I quite enjoyed working on live TV projects, as the combination of tight deadlines and high quality was quite an incredible learning platform as a professional artist. But working on large, high end live action feature projects was really where I learnt most of my trade. And gave me the most satisfaction.
Every film I worked on had some memorable experiences. Right from Avatar to Iron Man 3 to Jungle Book to The Planet of the Apes to The Hobbits to name a few.
But above all, the technical challenges and the high quality we reached in each and every of the projects that I worked on, the best memories come from working with amazing and skilled artists, from a variety of disciplines. As those were my true mentors and became my best friends.
Post Production, Animation, VFX, Motion Graphics, Video Editing …
What are some technologies and trends that you think are emerging in the VFX Industry?
In the last few years there has definitely been a bias from some major studios to make VFX a commodity. In the more negative sense of the word. When any product reaches a level of quality that attracts a mass of consumers and reaches a plateau of opportunities, large corporation tend to respond with maximising its sale values by leveraging marketing schemes and deliverable more than the core values of the product itself. This is often a commoditisation approach that tends to empower agents who are not necessarily knowledgeable of a product’s cycles, and in that process, lowering the quality of the product itself for the sake of profits. It is a pretty common event in modern society and it applies to any brand name, not just VFX.
One challenge with VFX’s technology and artistry is that it relies on the effectiveness of artists and visionaries for the most. And limiting the authority, ownerships and perspective of such a crowd has definitely directly impacted the overall quality of the last decade of productions, both technically and artistically. There are very few and apart creative forces who have been able to deliver project that one could identify as a truly creative breakthrough. While the majority of productions seem to have suffered from some of these commoditisation patterns.
The other bigger challenge with this current trend is that VFX, due to various, historical business arrangements, is often relying on unbalanced resources as well as very small and feeble economic cycles and margins. Which make the entire industry extremely susceptible to marketing failures and to unstable leadership. As a few recent bankruptcies have demonstrated.
It is taking some reasonable time for the VFX crowd to acknowledge these trends and learn to be profitable, as the majority has never been educated on fair business practices.
But. Thankfully, the VFX circle is also a crowd of extremely adaptable and talented individuals, who are quite capable at resolving issues, finding alternatives and leveraging their passion. Which I believe is one of the drives behind the current evolution in the use of artificial intelligence, virtual reality, virtual production, real time rendering, and so on.
There is still a long path ahead of us but I hope we are all learning ways to make our passion speaks in profitable ways for everyone.
It is also highly likely that, in a near future, larger software and hardware corporation, thanks to their more profitable business practices, large development teams and better understanding of marketing, will eventually take over a lot of the cycles that the current production houses currently run. And in that process allow creative studios to focus back on VFX artistry.
What effect has the pandemics-induced lockdown had on the industry?
It is still early to say. I fear that if live action production does not start soon, we may see some of the economic challenges I mention above. At both studio and artists’ scale. There is definitely a push from production houses to make large distribution clients understand the fragility of the moment, especially in relation to payment cycles and economic support. Thus, there is still a fair risk that the few studios which adopted a more commoditised view to production will make their artists pay some price for their choices.
But, any challenge brings opportunities. For example, there is finally some recognition into a momentum to rely on work-from-home as a feasible solution to a lot of the current office production’s limitations and general artistry restrictions. Which, while there is no win-win in this pandemic, could be a silver lining.
What would you say to the budding artists who wish to become CG artists or VFX professionals?
Follow your passion but treat this career as any other business.
Learn to be adaptable. Find a true balance between professional and family life. Carefully plan your future. And watch our channel to learn more about all these.
What inspired you to create a channel for aspiring artists?
As many fellow and respected artists, I love this industry, but I had to understand a lot of business practices at my own expenses.
You can learn tools, cycles and software from books and schools. But production life tends to drive its own rhythms and there are fewer opportunities to absorb those.
Along my career I had some challenges finding professional willing to share their time to invest into me. But I was still extremely fortunate to find other mentors who helped me to be economically and professionally successful in this business. I owe a lot to these people. I promised myself I would exchange that favour by helping other artists, myself.
What can students expect to learn from your channel?
I am excited to have the opportunity to fill some of the voids that the current education systems and industry may have. This by helping new artists with true life stories by some of the most accomplished and successful talents I met during my career. We will talk about technology trends as much as our life experiences as artists. Discussing career advises. Trying to look into the future of the industry. And suggesting professional tips. The aim through this mentor-ship is to inspire new generations to focus on what is more important for the VFX industry. Take responsibilities for their art and passions as much as their families.
And, in the process, to feel empowered to materialise from their imagination more and more of those creative, awe inspiring moments that this art form has gifted us with so far.
www.forbes.com/sites/jeffboss/2015/09/03/14-signs-of-an-adaptable-person/#46bd90e016ea
1. Adaptable people experiment.
2. Adaptable people see opportunity where others see failure.
3. Adaptable people are resourceful.
4. Adaptable people think ahead.
5. Adaptable people don’t whine.
6. Adaptable people talk to themselves.
7. Adaptable people don’t blame.
8. Adaptable people don’t claim fame.
9. Adaptable people are curious.
10. Adaptable people adapt.
11. Adaptable people stay current.
12. Adaptable people see systems.
13. Adaptable people open their minds.
14. Adaptable people know what they stand for.
www.awn.com/news/technicolor-files-chapter-15-us-citing-covid-19-impact
Technicolor has suffered a series of setbacks in recent months. On May 28, the company announced it had merged its Mill Film and MR. X VFX companies in response to industry changes brought about by the pandemic; operating now as MR. X, the company noted it would keep all facilities open in Toronto, Montreal, Los Angeles, Adelaide and Bangalore.
Last year in early December, MPC abruptly shut down its Vancouver facility, leaving what sources claimed was as many as 300 artists out of work.
A week later, the company and its former CEO Frederic Rose, were indicted for fraud and breach of trust by French authorities. The charges were levied as part of an ongoing investigation of their role in the bankruptcy and subsequent acquisition of Tarak Ben Ammar’s post-production group, Quinta Industries, in 2012.
![]()
Airplane manufacturing is no different from mortgage lending or insulin distribution or make-believe blood analyzing software (or VFX?) —another cash cow for the one percent, bound inexorably for the slaughterhouse.
The beginning of the end was “Boeing’s 1997 acquisition of McDonnell Douglas, a dysfunctional firm with a dilapidated aircraft plant in Long Beach and a CEO (Harry Stonecipher) who liked to use what he called the “Hollywood model” for dealing with engineers: Hire them for a few months when project deadlines are nigh, fire them when you need to make numbers.” And all that came with it. “Stonecipher’s team had driven the last nail in the coffin of McDonnell’s flailing commercial jet business by trying to outsource everything but design, final assembly, and flight testing and sales.”
It is understood, now more than ever, that capitalism does half-assed things like that, especially in concert with computer software and oblivious regulators.
There was something unsettlingly familiar when the world first learned of MCAS in November, about two weeks after the system’s unthinkable stupidity drove the two-month-old plane and all 189 people on it to a horrific death. It smacked of the sort of screwup a 23-year-old intern might have made—and indeed, much of the software on the MAX had been engineered by recent grads of Indian software-coding academies making as little as $9 an hour, part of Boeing management’s endless war on the unions that once represented more than half its employees.
Down in South Carolina, a nonunion Boeing assembly line that opened in 2011 had for years churned out scores of whistle-blower complaints and wrongful termination lawsuits packed with scenes wherein quality-control documents were regularly forged, employees who enforced standards were sabotaged, and planes were routinely delivered to airlines with loose screws, scratched windows, and random debris everywhere.
Shockingly, another piece of the quality failure is Boeing securing investments from all airliners, starting with SouthWest above all, to guarantee Boeing’s production lines support in exchange for fair market prices and favorite treatments. Basically giving Boeing financial stability independently on the quality of their product. “Those partnerships were but one numbers-smoothing mechanism in a diversified tool kit Boeing had assembled over the previous generation for making its complex and volatile business more palatable to Wall Street.”
Color Temperature of a light source describes the spectrum of light which is radiated from a theoretical “blackbody” (an ideal physical body that absorbs all radiation and incident light – neither reflecting it nor allowing it to pass through) with a given surface temperature.
https://en.wikipedia.org/wiki/Color_temperature
Or. Most simply it is a method of describing the color characteristics of light through a numerical value that corresponds to the color emitted by a light source, measured in degrees of Kelvin (K) on a scale from 1,000 to 10,000.
More accurately. The color temperature of a light source is the temperature of an ideal backbody that radiates light of comparable hue to that of the light source.
As such, the color temperature of a light source is a numerical measurement of its color appearance. It is based on the principle that any object will emit light if it is heated to a high enough temperature, and that the color of that light will shift in a predictable manner as the temperature is increased. The system is based on the color changes of a theoretical “blackbody radiator” as it is heated from a cold black to a white hot state.
So, why do we measure the hue of the light as a “temperature”? This was started in the late 1800s, when the British physicist William Kelvin heated a block of carbon. It glowed in the heat, producing a range of different colors at different temperatures. The black cube first produced a dim red light, increasing to a brighter yellow as the temperature went up, and eventually produced a bright blue-white glow at the highest temperatures. In his honor, Color Temperatures are measured in degrees Kelvin, which are a variation on Centigrade degrees. Instead of starting at the temperature water freezes, the Kelvin scale starts at “absolute zero,” which is -273 Centigrade.
More about black bodies here: https://www.pixelsham.com/2013/03/14/black-body-color
Details in the post
https://www.hdrsoft.com/resources/dri.html#bit-depth
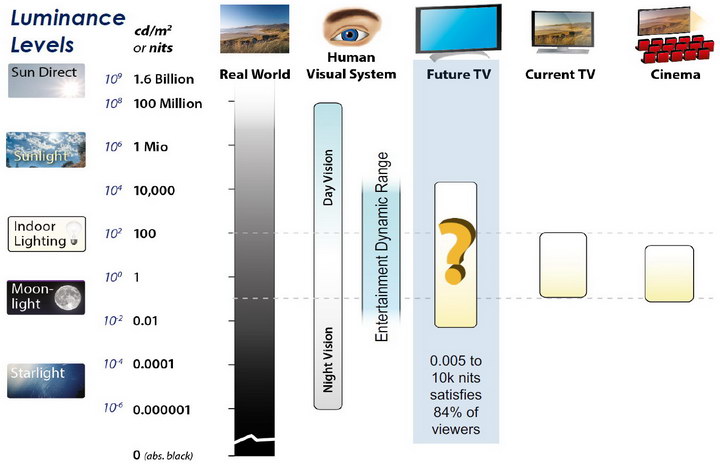
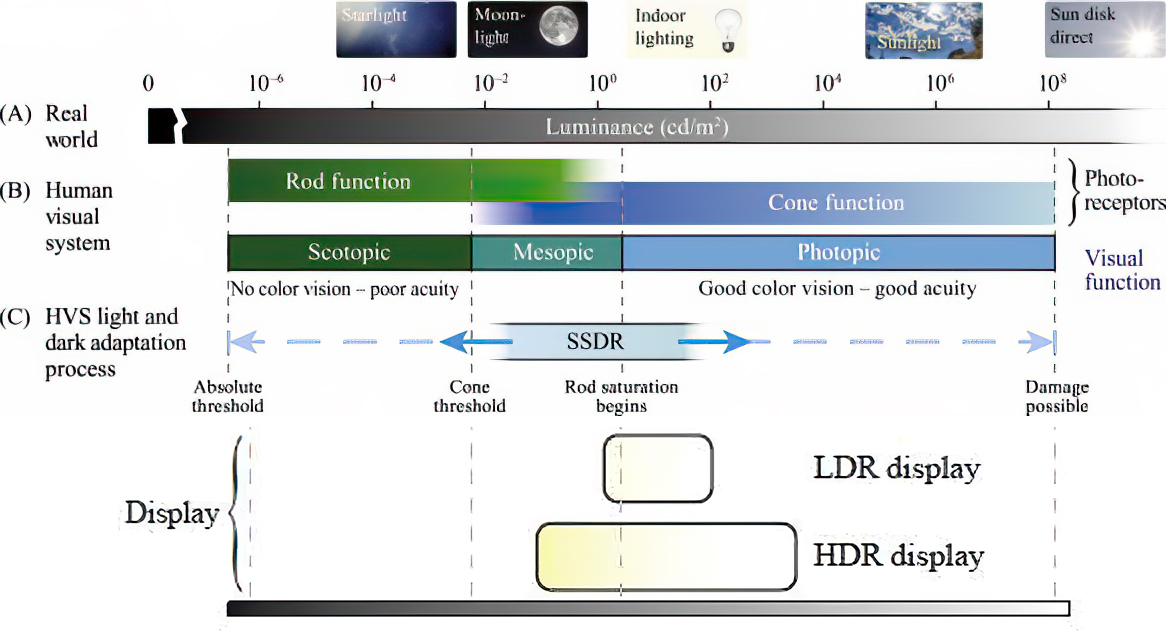
The dynamic range is a ratio between the maximum and minimum values of a physical measurement. Its definition depends on what the dynamic range refers to.
For a scene: Dynamic range is the ratio between the brightest and darkest parts of the scene.
For a camera: Dynamic range is the ratio of saturation to noise. More specifically, the ratio of the intensity that just saturates the camera to the intensity that just lifts the camera response one standard deviation above camera noise.
For a display: Dynamic range is the ratio between the maximum and minimum intensities emitted from the screen.
The Dynamic Range of real-world scenes can be quite high — ratios of 100,000:1 are common in the natural world. An HDR (High Dynamic Range) image stores pixel values that span the whole tonal range of real-world scenes. Therefore, an HDR image is encoded in a format that allows the largest range of values, e.g. floating-point values stored with 32 bits per color channel. Another characteristics of an HDR image is that it stores linear values. This means that the value of a pixel from an HDR image is proportional to the amount of light measured by the camera.
For TVs HDR is great, but it’s not the only new TV feature worth discussing.
Wide color gamut, or WCG, is often lumped in with HDR. While they’re often found together, they’re not intrinsically linked. Where HDR is an increase in the dynamic range of the picture (with contrast and brighter highlights in particular), a TV’s wide color gamut coverage refers to how much of the new, larger color gamuts a TV can display.
Wide color gamuts only really matter for HDR video sources like UHD Blu-rays and some streaming video, as only HDR sources are meant to take advantage of the ability to display more colors.
www.cnet.com/how-to/what-is-wide-color-gamut-wcg/
Color depth is only one aspect of color representation, expressing the precision with which the amount of each primary can be expressed through a pixel; the other aspect is how broad a range of colors can be expressed (the gamut)
Image rendering bit depth
Wide color gamuts include a greater number of colors than what most current TVs can display, so the greater a TV’s coverage of a wide color gamut, the more colors a TV will be able to reproduce.
When we talk about a color space or color gamut we refer to the range of color values stored in an image. The perception of these color also requires a display that has been tuned with to resolve these color profiles at best. This is often referred to as a ‘viewer lut’.
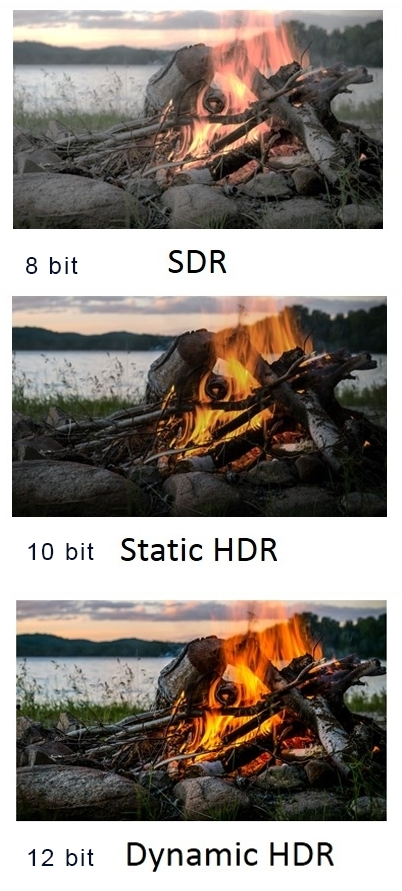
So this comes also usually paired with an increase in bit depth, going from the old 8 bit system (256 shades per color, with the potential of over 16.7 million colors: 256 green x 256 blue x 256 red) to 10 (1024+ shades per color, with access to over a billion colors) or higher bits, like 12 bit (4096 shades per RGB for 68 billion colors).
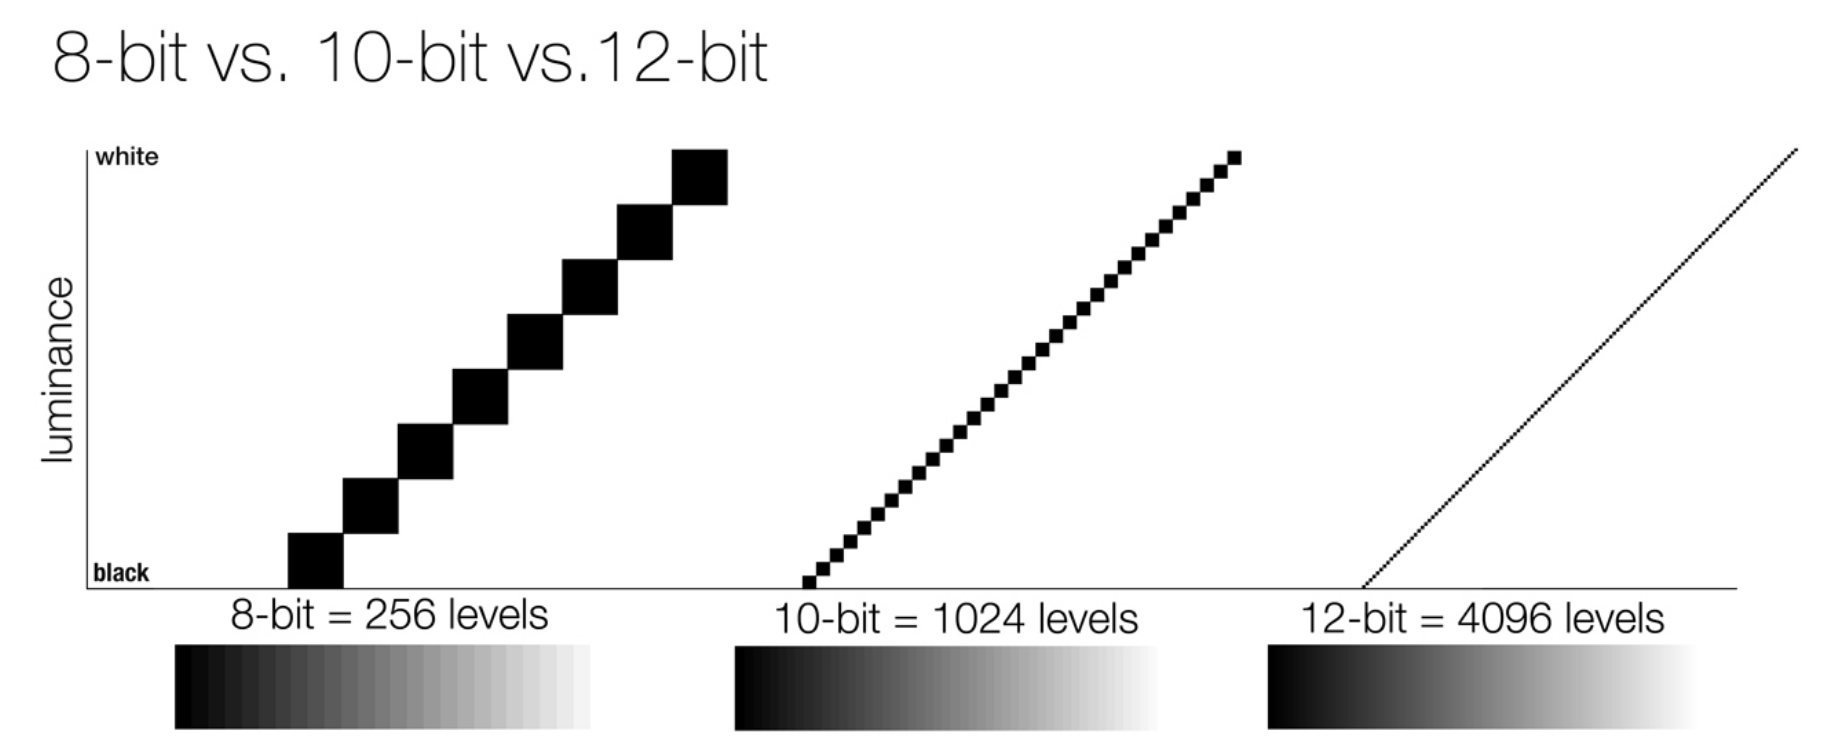
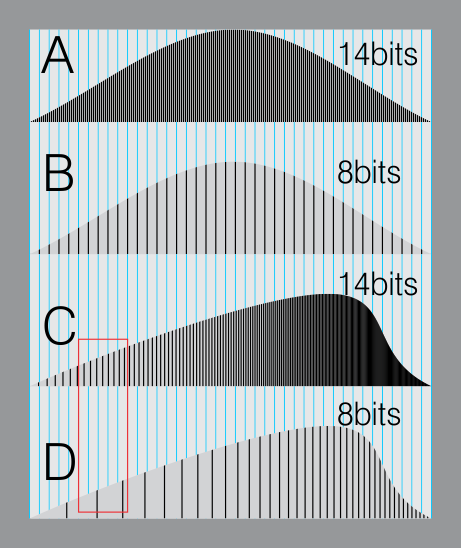
The advantage of higher bit depth is in the ability to bias color with the minimum loss.
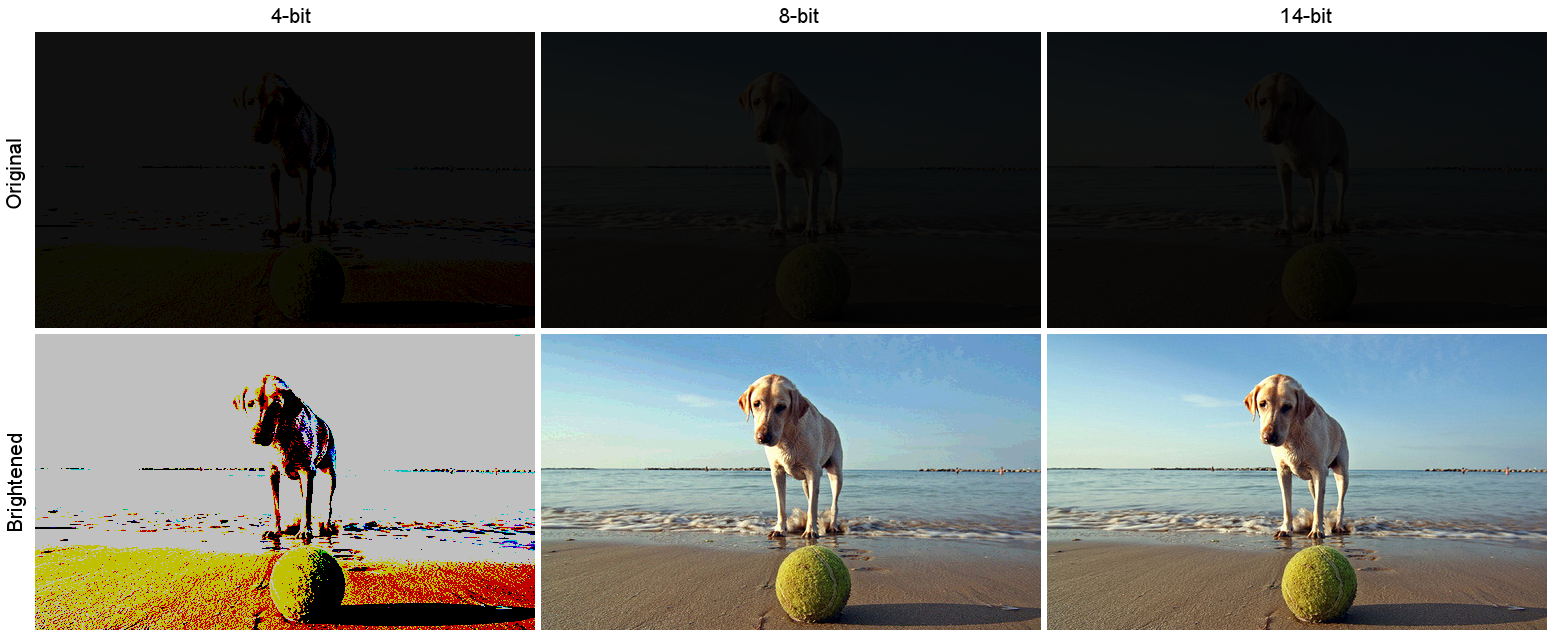
For an extreme example, raising the brightness from a completely dark image allows for better reproduction, independently on the reproduction medium, due to the amount of data available at editing time:
For reference, 8-bit images (i.e. 24 bits per pixel for a color image) are considered Low Dynamic Range.
They can store around 5 stops of light and each pixel carry a value from 0 (black) to 255 (white).
As a comparison, DSLR cameras can capture ~12-15 stops of light and they use RAW files to store the information.
https://www.cambridgeincolour.com/tutorials/dynamic-range.htm
https://www.hdrsoft.com/resources/dri.html#bit-depth
Note that the number of bits itself may be a misleading indication of the real dynamic range that the image reproduces — converting a Low Dynamic Range image to a higher bit depth does not change its dynamic range, of course.
Also note that bit depth and dynamic range are often confused as one, but are indeed separate concepts and there is no direct one to one relationship between them. Bit depth is about capacity, dynamic range is about the actual ratio of data stored.
The bit depth of a capturing or displaying device gives you an indication of its dynamic range capacity. That is, the highest dynamic range that the device would be capable of reproducing if all other constraints are eliminated.
https://rawpedia.rawtherapee.com/Bit_Depth
Finally, note that there are two ways to “count” bits for an image — either the number of bits per color channel (BPC) or the number of bits per pixel (BPP). A bit (0,1) is the smallest unit of data stored in a computer.
For a grayscale image, 8-bit means that each pixel can be one of 256 levels of gray (256 is 2 to the power 8).
For an RGB color image, 8-bit means that each one of the three color channels can be one of 256 levels of color.
Since each pixel is represented by 3 colors in this case, 8-bit per color channel actually means 24-bit per pixel.
Similarly, 16-bit for an RGB image means 65,536 levels per color channel and 48-bit per pixel.
To complicate matters, when an image is classified as 16-bit, it just means that it can store a maximum 65,535 values. It does not necessarily mean that it actually spans that range. If the camera sensors can not capture more than 12 bits of tonal values, the actual bit depth of the image will be at best 12-bit and probably less because of noise.
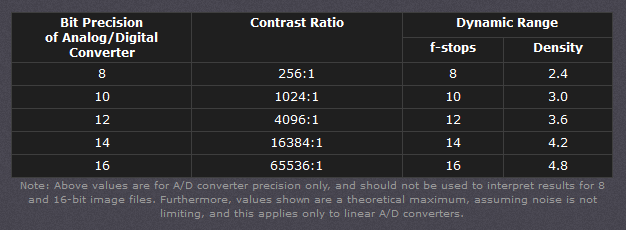
The following table attempts to summarize the above for the case of an RGB color image.
| Type of digital support | Bit depth per color channel | Bit depth per pixel | FStops | Theoretical maximum Dynamic Range | Reality |
|---|---|---|---|---|---|
| 8-bit | 8 | 24 | 8 | 256:1 | most consumer images |
| 12-bit CCD | 12 | 36 | 12 | 4,096:1 | real maximum limited by noise |
| 14-bit CCD | 14 | 42 | 14 | 16,384:1 | real maximum limited by noise |
| 16-bit TIFF (integer) | 16 | 48 | 16 | 65,536:1 | bit-depth in this case is not directly related to the dynamic range captured |
| 16-bit float EXR | 16 | 48 | 30 | 65,536:1 | values are distributed more closely in the (lower) darker tones than in the (higher) lighter ones, thus allowing for a more accurate description of the tones more significant to humans. The range of normalized 16-bit floats can represent thirty stops of information with 1024 steps per stop. We have eighteen and a half stops over middle gray, and eleven and a half below. The denormalized numbers provide an additional ten stops with decreasing precision per stop. http://download.nvidia.com/developer/GPU_Gems/CD_Image/Image_Processing/OpenEXR/OpenEXR-1.0.6/doc/#recs |
| HDR image (e.g. Radiance format) | 32 | 96 | “infinite” | 4.3 billion:1 | real maximum limited by the captured dynamic range |
32-bit floats are often called “single-precision” floats, and 64-bit floats are often called “double-precision” floats. 16-bit floats therefore are called “half-precision” floats, or just “half floats”.
https://petapixel.com/2018/09/19/8-12-14-vs-16-bit-depth-what-do-you-really-need
On a separate note, even Photoshop does not handle 16bit per channel. Photoshop does actually use 16-bits per channel. However, it treats the 16th digit differently – it is simply added to the value created from the first 15-digits. This is sometimes called 15+1 bits. This means that instead of 216 possible values (which would be 65,536 possible values) there are only 215+1 possible values (which is 32,768 +1 = 32,769 possible values).
Rec-601 (for the older SDTV format, very similar to rec-709) and Rec-709 (the HDTV’s recommended set of color standards, at times also referred to sRGB, although not exactly the same) are currently the most spread color formats and hardware configurations in the world.
Following those you can find the larger P3 gamut, more commonly used in theaters and in digital production houses (with small variations and improvements to color coverage), as well as most of best 4K/WCG TVs.
And a new standard is now promoted against P3, referred to Rec-2020 and UHDTV.

It is still debatable if this is going to be adopted at consumer level beyond the P3, mainly due to lack of hardware supporting it. But initial tests do prove that it would be a future proof investment.
www.colour-science.org/anders-langlands/
Rec. 2020 is ultimately designed for television, and not cinema. Therefore, it is to be expected that its properties must behave according to current signal processing standards. In this respect, its foundation is based on current HD and SD video signal characteristics.
As far as color bit depth is concerned, it allows for a maximum of 12 bits, which is more than enough for humans.
Comparing standards, REC-709 covers 35.9% of the human visible spectrum. P3 45.5%. And REC-2020 75.8%.
https://www.avsforum.com/forum/166-lcd-flat-panel-displays/2812161-what-color-volume.html
Comparing coverage to hardware devices
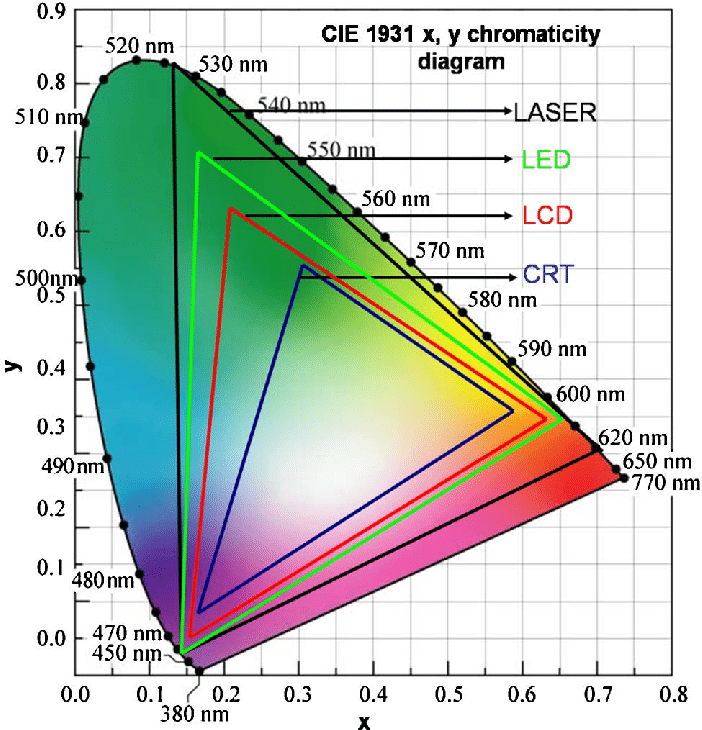
To note that all the new standards generally score very high on the Pointer’s Gamut chart. But with REC-2020 scoring 99.9% vs P3 at 88.2%.
www.tftcentral.co.uk/articles/pointers_gamut.htm
https://www.slideshare.net/hpduiker/acescg-a-common-color-encoding-for-visual-effects-applications
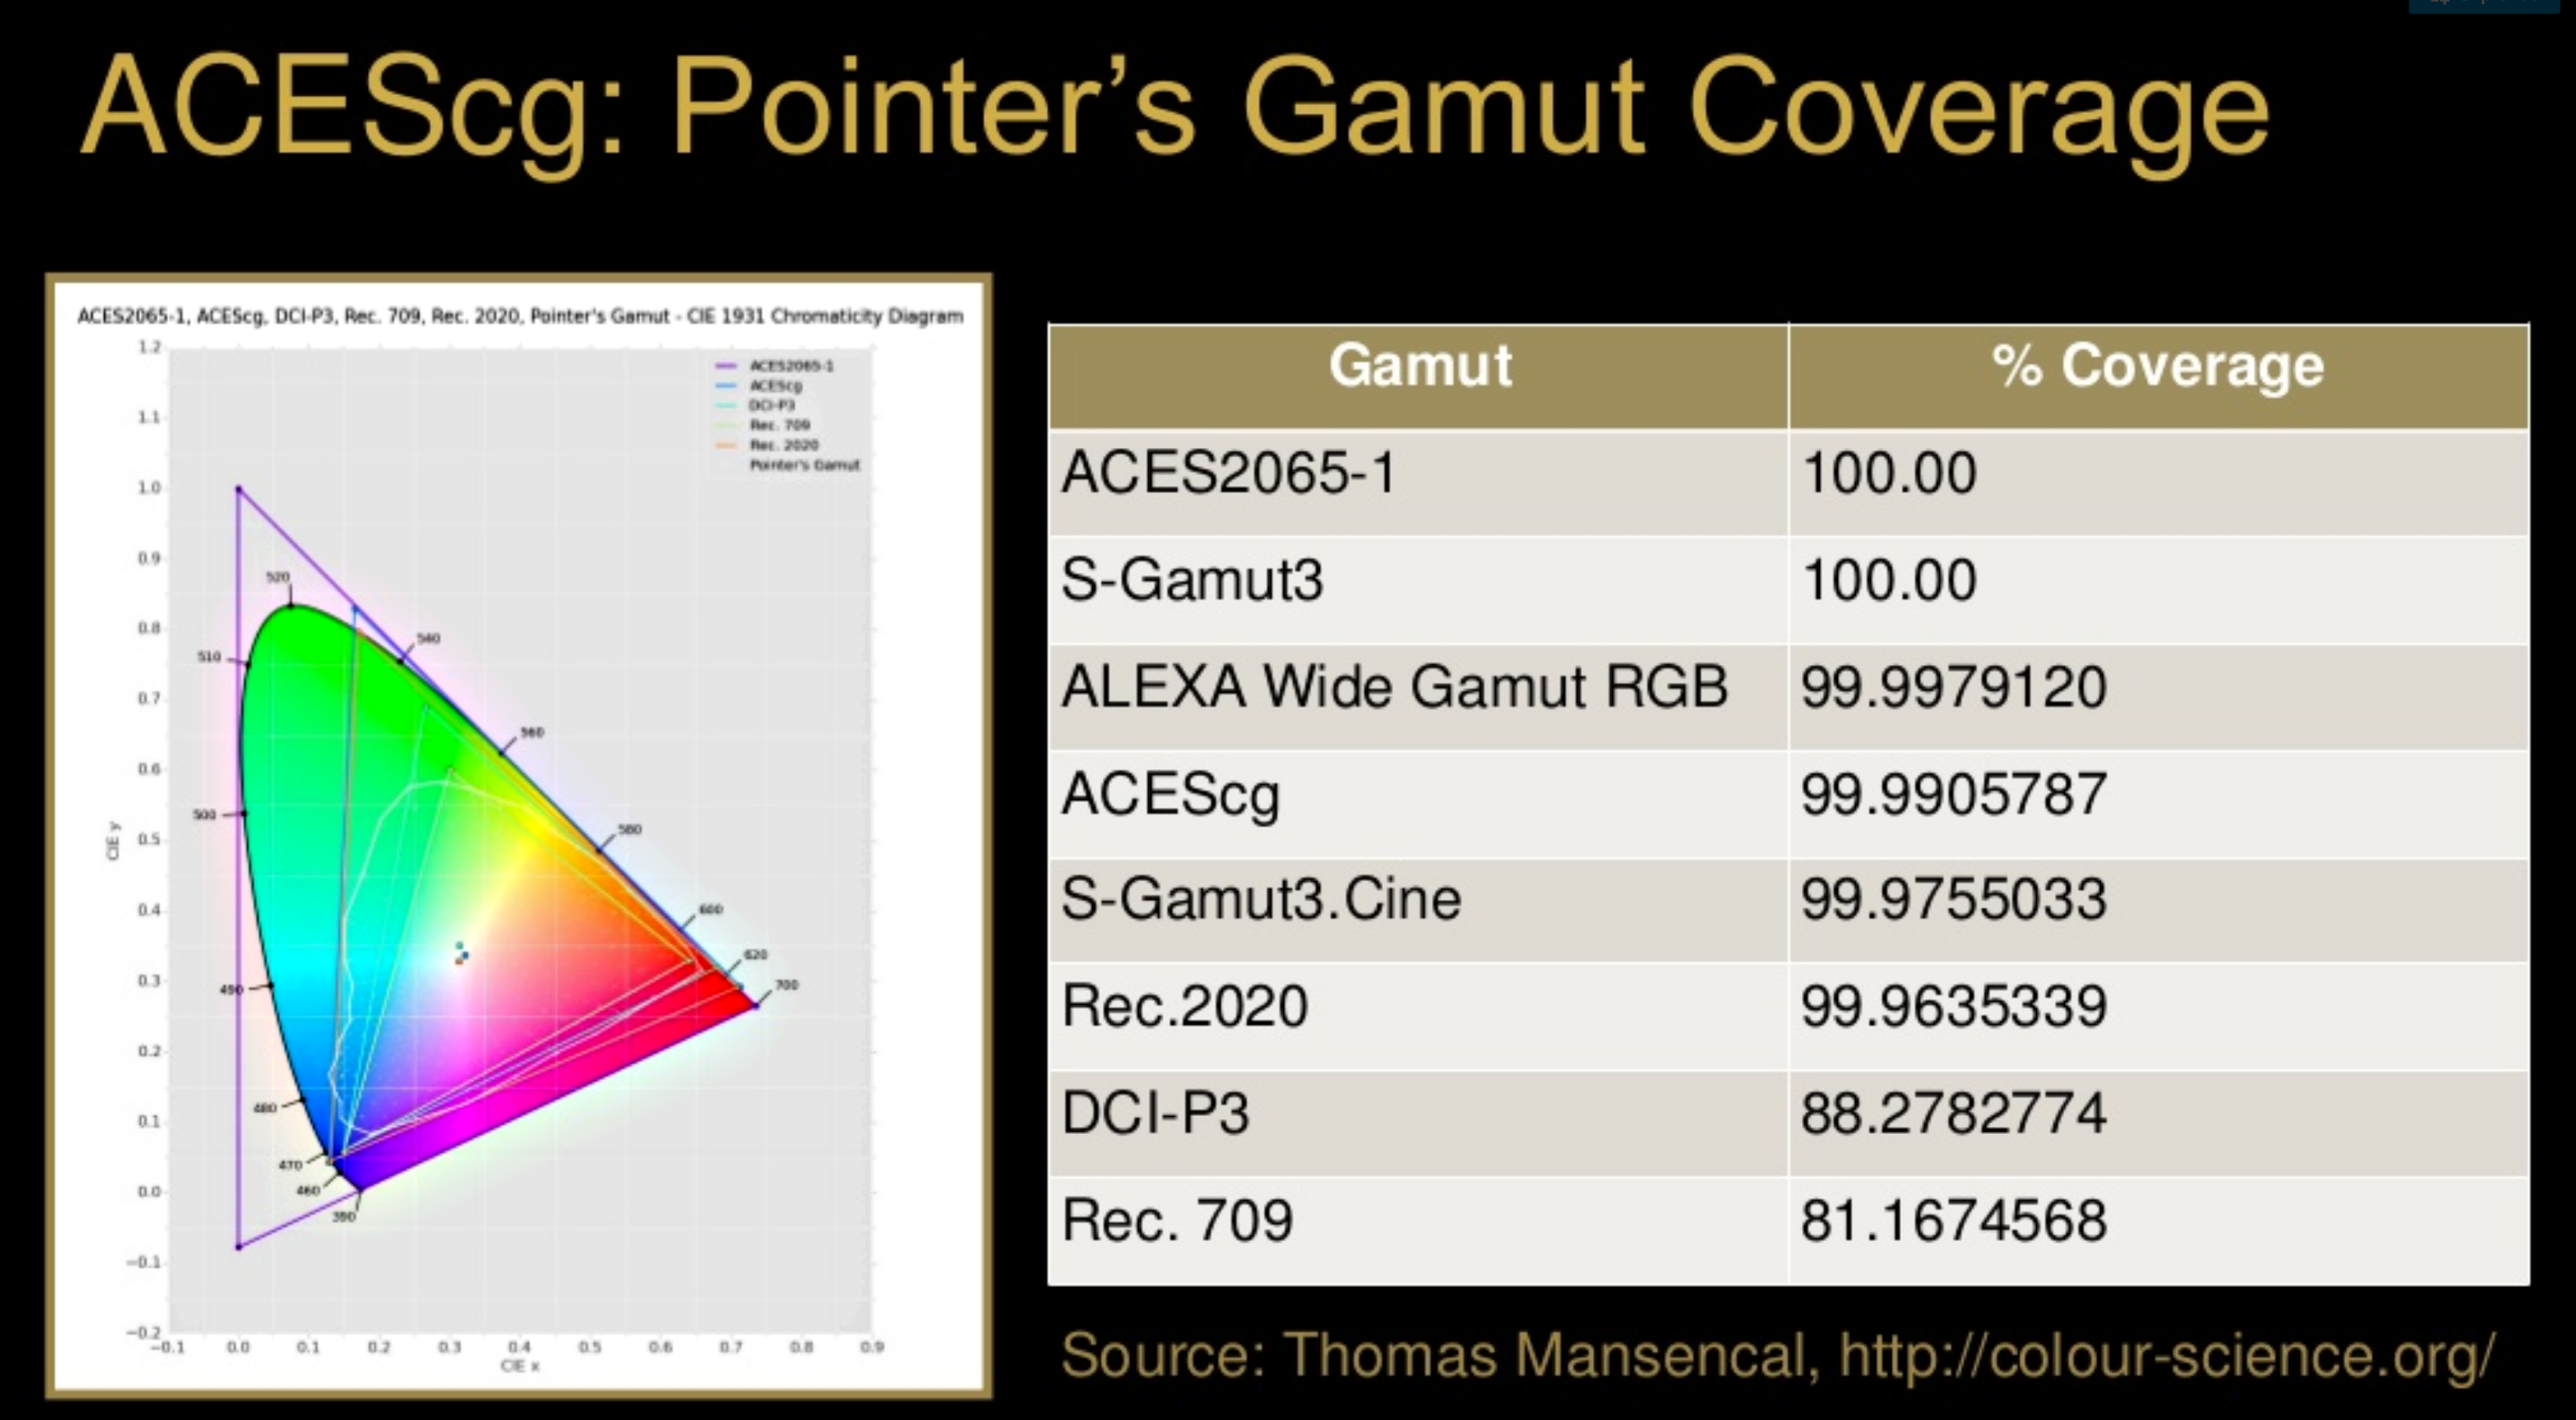
The Pointer’s gamut is (an approximation of) the gamut of real surface colors as can be seen by the human eye, based on the research by Michael R. Pointer (1980). What this means is that every color that can be reflected by the surface of an object of any material is inside the Pointer’s gamut. Basically establishing a widely respected target for color reproduction. Visually, Pointers Gamut represents the colors we see about us in the natural world. Colors outside Pointers Gamut include those that do not occur naturally, such as neon lights and computer-generated colors possible in animation. Which would partially be accounted for with the new gamuts.
cinepedia.com/picture/color-gamut/
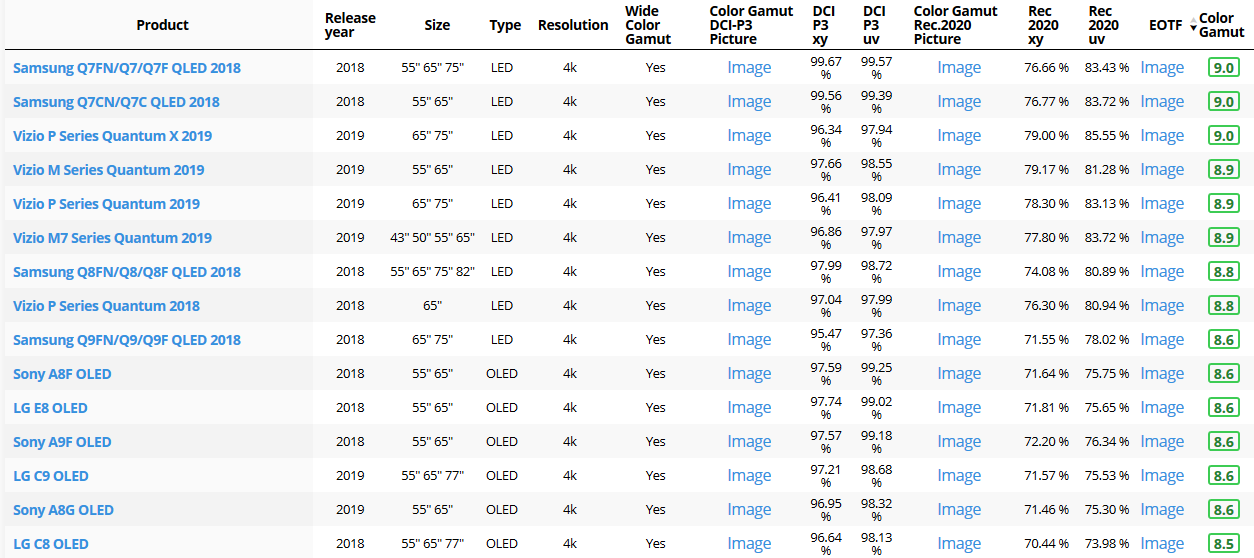
Not all current TVs can support the full spread of the new gamuts. Here is a list of modern TVs’ color coverage in percentage:
www.rtings.com/tv/tests/picture-quality/wide-color-gamut-rec-709-dci-p3-rec-2020
There are no TVs that can come close to displaying all the colors within Rec.2020, and there likely won’t be for at least a few years. However, to help future-proof the technology, Rec.2020 support is already baked into the HDR spec. That means that the same genuine HDR media that fills the DCI P3 space on a compatible TV now, will in a few years also fill Rec.2020 on a TV supporting that larger space.
Rec.2020’s main gains are in the number of new tones of green that it will display, though it also offers improvements to the number of blue and red colors as well. Altogether, Rec.2020 will cover about 75% of the visual spectrum, which is a sizeable increase in coverage even over DCI P3.
Dolby Vision
https://www.highdefdigest.com/news/show/what-is-dolby-vision/39049
https://www.techhive.com/article/3237232/dolby-vision-vs-hdr10-which-is-best.html
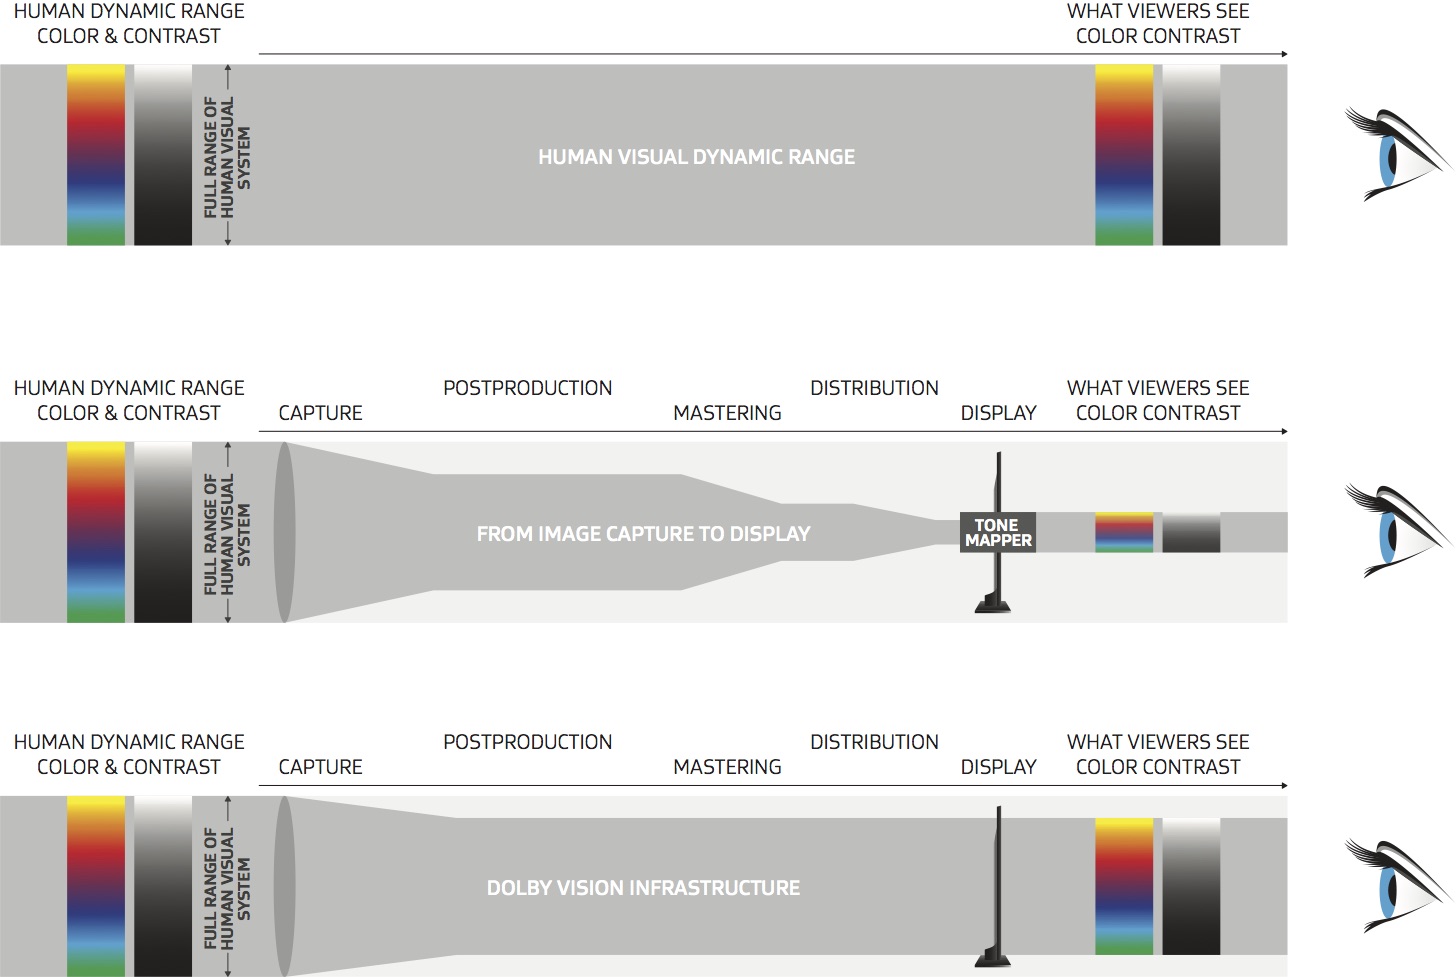
Dolby Vision is a proprietary end-to-end High Dynamic Range (HDR) format that covers content creation and playback through select cinemas, Ultra HD displays, and 4K titles. Like other HDR standards, the process uses expanded brightness to improve contrast between dark and light aspects of an image, bringing out deeper black levels and more realistic details in specular highlights — like the sun reflecting off of an ocean — in specially graded Dolby Vision material.
The iPhone 12 Pro gets the ability to record 4K 10-bit HDR video. According to Apple, it is the very first smartphone that is capable of capturing Dolby Vision HDR.
The iPhone 12 Pro takes two separate exposures and runs them through Apple’s custom image signal processor to create a histogram, which is a graph of the tonal values in each frame. The Dolby Vision metadata is then generated based on that histogram. In Laymen’s terms, it is essentially doing real-time grading while you are shooting. This is only possible due to the A14 Bionic chip.
Dolby Vision also allows for 12-bit color, as opposed to HDR10’s and HDR10+’s 10-bit color. While no retail TV we’re aware of supports 12-bit color, Dolby claims it can be down-sampled in such a way as to render 10-bit color more accurately.
Resources for more reading:
https://www.avsforum.com/forum/166-lcd-flat-panel-displays/2812161-what-color-volume.html
wolfcrow.com/say-hello-to-rec-2020-the-color-space-of-the-future/
www.cnet.com/news/ultra-hd-tv-color-part-ii-the-future/
Where is our eye attracted first? Why?
Size. Focus. Lighting. Color.
Size. Mr. White (Harvey Keitel) on the right.
Focus. He’s one of the two objects in focus.
Lighting. Mr. White is large and in focus and Mr. Pink (Steve Buscemi) is highlighted by
a shaft of light.
Color. Both are black and white but the read on Mr. White’s shirt now really stands out.
What type of lighting?
-> High key lighting.
Features bright, even illumination and few conspicuous shadows. This lighting key is often used in musicals and comedies.
Low key lighting
Features diffused shadows and atmospheric pools of light. This lighting key is often used in mysteries and thrillers.
High contrast lighting
Features harsh shafts of lights and dramatic streaks of blackness. This type of lighting is often used in tragedies and melodramas.
What type of shot?
Extreme long shot
Taken from a great distance, showing much of the locale. Ifpeople are included in these shots, they usually appear as mere specks
-> Long shot
Corresponds to the space between the audience and the stage in a live theater. The long shots show the characters and some of the locale.
Full shot
Range with just enough space to contain the human body in full. The full shot shows the character and a minimal amount of the locale.
Medium shot
Shows the human figure from the knees or waist up.
Close-Up
Concentrates on a relatively small object and show very little if any locale.
Extreme close-up
Focuses on an unnaturally small portion of an object, giving that part great detail and symbolic significance.
What angle?
Bird’s-eye view.
The shot is photographed directly from above. This type of shot can be disorienting, and the people photographed seem insignificant.
High angle.
This angle reduces the size of the objects photographed. A person photographed from this angle seems harmless and insignificant, but to a lesser extent than with the bird’s-eye view.
-> Eye-level shot.
The clearest view of an object, but seldom intrinsically dramatic, because it tends to be the norm.
Low angle.
This angle increases high and a sense of verticality, heightening the importance of the object photographed. A person shot from this angle is given a sense of power and respect.
Oblique angle.
For this angle, the camera is tilted laterally, giving the image a slanted appearance. Oblique angles suggest tension, transition, a impending movement. They are also called canted or dutch angles.
What is the dominant color?
The use of color in this shot is symbolic. The scene is set in warehouse. Both the set and characters are blues, blacks and whites.
This was intentional allowing for the scenes and shots with blood to have a great level of contrast.
What is the Lens/Filter/Stock?
Telephoto lens.
A lens that draws objects closer but also diminishes the illusion of depth.
Wide-angle lens.
A lens that takes in a broad area and increases the illusion of depth but sometimes distorts the edges of the image.
Fast film stock.
Highly sensitive to light, it can register an image with little illumination. However, the final product tends to be grainy.
Slow film stock.
Relatively insensitive to light, it requires a great deal of illumination. The final product tends to look polished.
The lens is not wide-angle because there isn’t a great sense of depth, nor are several planes in focus. The lens is probably long but not necessarily a telephoto lens because the depth isn’t inordinately compressed.
The stock is fast because of the grainy quality of the image.
Subsidiary Contrast; where does the eye go next?
The two guns.
How much visual information is packed into the image? Is the texture stark, moderate, or highly detailed?
Minimalist clutter in the warehouse allows a focus on a character driven thriller.
What is the Composition?
Horizontal.
Compositions based on horizontal lines seem visually at rest and suggest placidity or peacefulness.
Vertical.
Compositions based on vertical lines seem visually at rest and suggest strength.
-> Diagonal.
Compositions based on diagonal, or oblique, lines seem dynamic and suggest tension or anxiety.
-> Binary. Binary structures emphasize parallelism.
Triangle.
Triadic compositions stress the dynamic interplay among three main
Circle.
Circular compositions suggest security and enclosure.
Is the form open or closed? Does the image suggest a window that arbitrarily isolates a fragment of the scene? Or a proscenium arch, in which the visual elements are carefully arranged and held in balance?
The most nebulous of all the categories of mise en scene, the type of form is determined by how consciously structured the mise en scene is. Open forms stress apparently simple techniques, because with these unself-conscious methods the filmmaker is able to emphasize the immediate, the familiar, the intimate aspects of reality. In open-form images, the frame tends to be deemphasized. In closed form images, all the necessary information is carefully structured within the confines of the frame. Space seems enclosed and self-contained rather than continuous.
Could argue this is a proscenium arch because this is such a classic shot with parallels and juxtapositions.
Is the framing tight or loose? Do the character have no room to move around, or can they move freely without impediments?
Shots where the characters are placed at the edges of the frame and have little room to move around within the frame are considered tight.
Longer shots, in which characters have room to move around within the frame, are considered loose and tend to suggest freedom.
Center-framed giving us the entire scene showing isolation, place and struggle.
Depth of Field. On how many planes is the image composed (how many are in focus)? Does the background or foreground comment in any way on the mid-ground?
Standard DOF, one background and clearly defined foreground.
Which way do the characters look vis-a-vis the camera?
An actor can be photographed in any of five basic positions, each conveying different psychological overtones.
Full-front (facing the camera):
the position with the most intimacy. The character is looking in our direction, inviting our complicity.
Quarter Turn:
the favored position of most filmmakers. This position offers a high degree of intimacy but with less emotional involvement than the full-front.
-> Profile (looking of the frame left or right):
More remote than the quarter turn, the character in profile seems unaware of being observed, lost in his or her own thoughts.
Three-quarter Turn:
More anonymous than the profile, this position is useful for conveying a character’s unfriendly or antisocial feelings, for in effect, the character is partially turning his or her back on us, rejecting our interest.
Back to Camera:
The most anonymous of all positions, this position is often used to suggest a character’s alienation from the world. When a character has his or her back to the camera, we can only guess what’s taking place internally, conveying a sense of concealment, or mystery.
How much space is there between the characters?
Extremely close, for a gunfight.
The way people use space can be divided into four proxemic patterns.
Intimate distances.
The intimate distance ranges from skin contact to about eighteen inches away. This is the distance of physical involvement–of love, comfort, and tenderness between individuals.
-> Personal distances.
The personal distance ranges roughly from eighteen inches away to about four feet away. These distances tend to be reserved for friends and acquaintances. Personal distances preserve the privacy between individuals, yet these rages don’t necessarily suggest exclusion, as intimate distances often do.
Social distances.
The social distance rages from four feet to about twelve feet. These distances are usually reserved for impersonal business and casual social gatherings. It’s a friendly range in most cases, yet somewhat more formal than the personal distance.
Public distances.
The public distance extends from twelve feet to twenty-five feet or more. This range tends to be formal and rather detached.
https://crontab.guru/#0_7-19_*_*_*
crontab myCrontabName
crontab -e (edit cronjob)
crontab -l (list cronjobs)
crontab -r (remove cronjob)
Example edit outside vim
crontab -l > file [ copy the crontab to a file ].
vi file [ make changes to the file as per your need ]
crontab file [ this makes the “file” as new crontab ]
Example file
MAIL=me@email.com
SHELL=/bin/tcsh
0 5 * * MON source /home/username/file.bat
http://www.derekjenson.com/3d-blog/ies-light-profiles
https://ieslibrary.com/en/browse#ies
https://leomoon.com/store/shaders/ies-lights-pack
https://docs.arnoldrenderer.com/display/a5afmug/ai+photometric+light
IES profiles are useful for creating life-like lighting, as they can represent the physical distribution of light from any light source.
The IES format was created by the Illumination Engineering Society, and most lighting manufacturers provide IES profile for the lights they manufacture.
In my experience, a 40 hour work week is a benchmark of the most effective teams. They have work-life balance. They have buffer to respond to opportunity and to deal with crunches.
http://motionographer.com/2011/10/12/worklife-the-40-hour-work-week/
(vfxsoldier.wordpress.com)
VFX Artist Aruna Inversin has a great post on Vancouver’s skyrocketing real estate prices:
http://www.huffingtonpost.com/eric-roth/the-real-wizards-of-oz-de_b_1166422.html
Visual effects are the true “movie stars” of big studio pictures — they turn today’s movies into box office hits the same way big name actors ensured the success of classic films. In fact, 46 of the 50 top worldwide Box Office films of all time were visual effects-driven. And movies and broadcast programs you wouldn’t think of as visual effects driven routinely utilize “invisible” effects to make changes to hair color, the sky, or to the background of a scene — even creating the entire backlot and sets.
https://www.youtube.com/audiolibrary/music?nv=1
https://www.bensound.com/royalty-free-music/2
https://www.partnersinrhyme.com/pir/free_music_loops.shtml
http://www.partnersinrhyme.com/
http://www.archive.org/details/opensource_audio/
http://wiki.creativecommons.org/Content_Directories
http://hissandaroar.com/free-sounds/
FabFi is an open-source, FabLab-grown system using common building materials and off-the-shelf electronics to transmit wireless ethernet signals across distances of up to several miles. With Fabfi, communities can build their own wireless networks to gain high-speed internet connectivity—thus enabling them to access online educational, medical, and other resources.
http://code.google.com/p/fabfi/wiki/FabFi
COLLECTIONS
| Featured AI
| Design And Composition
| Explore posts
POPULAR SEARCHES
unreal | pipeline | virtual production | free | learn | photoshop | 360 | macro | google | nvidia | resolution | open source | hdri | real-time | photography basics | nuke
FEATURED POSTS
Social Links
DISCLAIMER – Links and images on this website may be protected by the respective owners’ copyright. All data submitted by users through this site shall be treated as freely available to share.
