Colour is an open-source Python package providing a comprehensive number of algorithms and datasets for colour science. It is freely available under the BSD-3-Clause terms.
Decide when to include the shebang in Python scripts
Define the shebang in a portable way across systems
Pass arguments to the command defined in a shebang
Know the shebang’s limitations and some of its alternatives
Execute scripts through a custom interpreter written in Python
In short, a shebang is a special kind of comment that you may include in your source code to tell the operating system’s shell where to find the interpreter for the rest of the file:
NumPy (Numerical Python) is an open source Python library that’s used in almost every field of science and engineering. It’s the universal standard for working with numerical data in Python, and it’s at the core of the scientific Python and PyData ecosystems. NumPy users include everyone from beginning coders to experienced researchers doing state-of-the-art scientific and industrial research and development. The NumPy API is used extensively in Pandas, SciPy, Matplotlib, scikit-learn, scikit-image and most other data science and scientific Python packages.
The NumPy library contains multidimensional array and matrix data structures (you’ll find more information about this in later sections). It provides ndarray, a homogeneous n-dimensional array object, with methods to efficiently operate on it. NumPy can be used to perform a wide variety of mathematical operations on arrays. It adds powerful data structures to Python that guarantee efficient calculations with arrays and matrices and it supplies an enormous library of high-level mathematical functions that operate on these arrays and matrices.
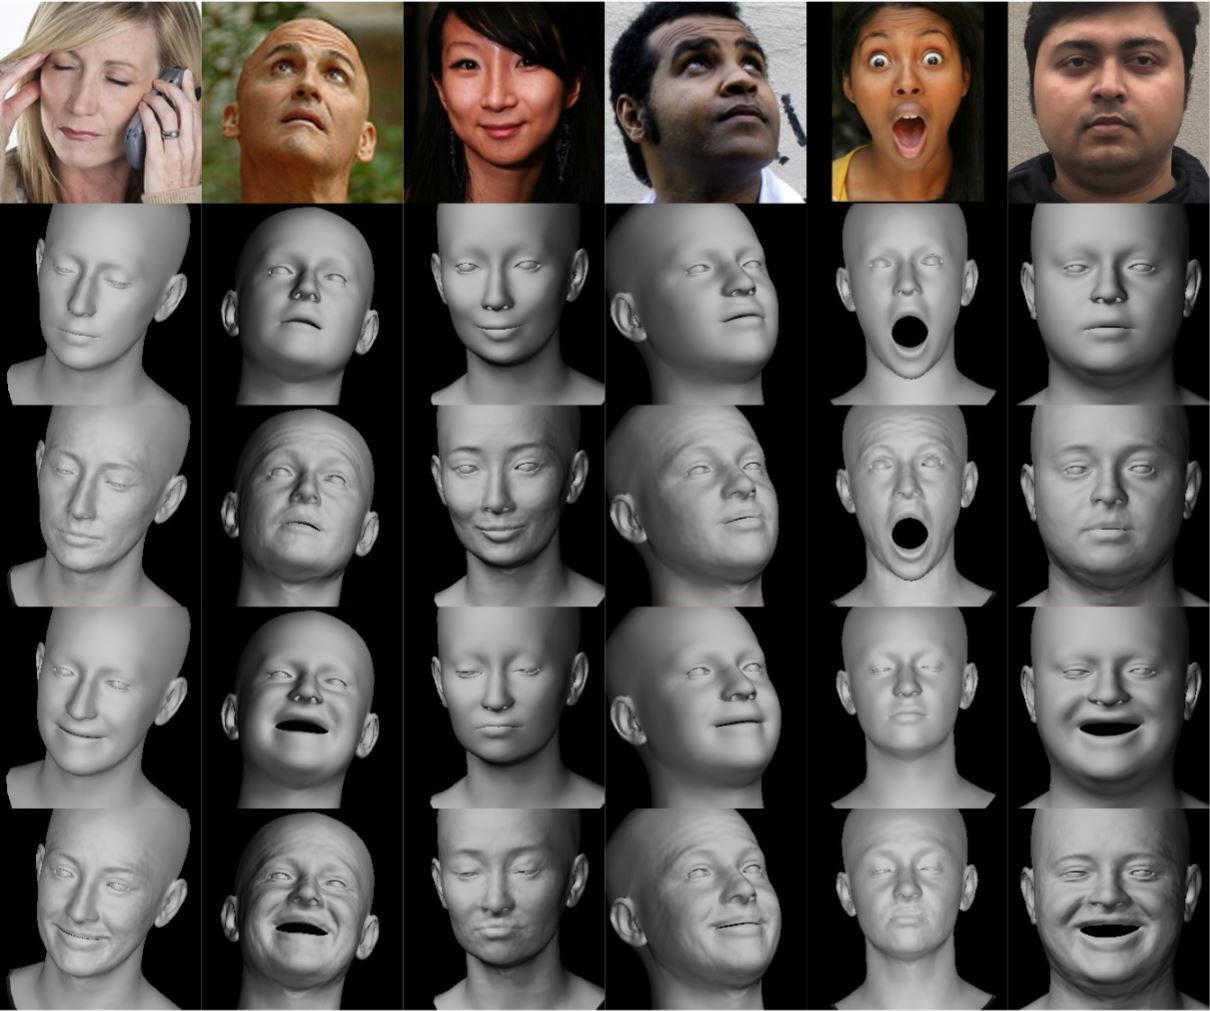
Exposure Fusion is a method for combining images taken with different exposure settings into one image that looks like a tone mapped High Dynamic Range (HDR) image.
Everything in Python is an object.
Since everything in Python is an Object, every variable holds an object instance. When an object is initiated, it is assigned a unique object id. Its type is defined at runtime and once set can never change, however its state can be changed if it is mutable.
Simply put, a mutable object can be changed after it is created, and an immutable object can’t.
Mutable objects:
list, dict, set, byte array
Immutable objects:
int, float, complex, string, tuple, frozen set [note: immutable version of set], bytes
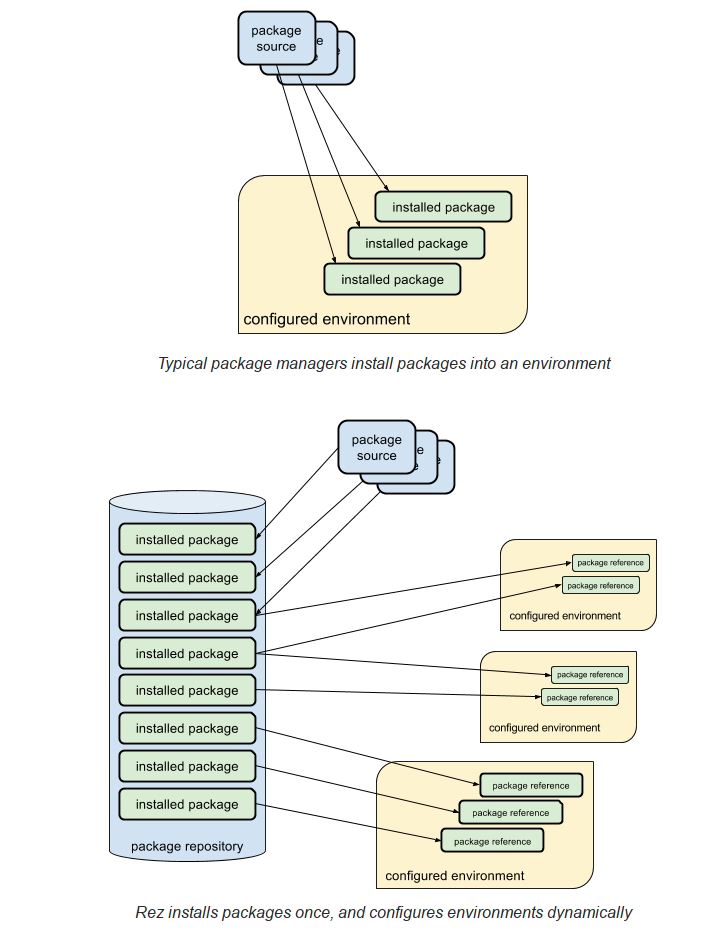
Rez is a cross-platform package manager with a difference. Using Rez you can create standalone environments configured for a given set of packages. However, unlike many other package managers, packages are not installed into these standalone environments. Instead, all package versions are installed into a central repository, and standalone environments reference these existing packages. This means that configured environments are lightweight, and very fast to create, often taking just a few seconds to configure despite containing hundreds of packages.
Working for a VFX (Visual Effects) studio provides numerous opportunities to leverage the power of Python and OpenCV for various tasks. OpenCV is a versatile computer vision library that can be applied to many aspects of the VFX pipeline. Here’s a detailed list of opportunities to take advantage of Python and OpenCV in a VFX studio:
Image and Video Processing:
Preprocessing: Python and OpenCV can be used for tasks like resizing, color correction, noise reduction, and frame interpolation to prepare images and videos for further processing.
Format Conversion: Convert between different image and video formats using OpenCV’s capabilities.
Tracking and Matchmoving:
Feature Detection and Tracking: Utilize OpenCV to detect and track features in image sequences, which is essential for matchmoving tasks to integrate computer-generated elements into live-action footage.
Rotoscoping and Masking:
Segmentation and Masking: Use OpenCV for creating and manipulating masks and alpha channels for various VFX tasks, like isolating objects or characters from their backgrounds.
Camera Calibration:
Intrinsic and Extrinsic Calibration: Python and OpenCV can help calibrate cameras for accurate 3D scene reconstruction and camera tracking.
3D Scene Reconstruction:
Stereoscopy: Use OpenCV to process stereoscopic image pairs for creating 3D depth maps and generating realistic 3D scenes.
Structure from Motion (SfM): Implement SfM techniques to create 3D models from 2D image sequences.
Green Screen and Blue Screen Keying:
Chroma Keying: Implement advanced keying algorithms using OpenCV to seamlessly integrate actors and objects into virtual environments.
Particle and Fluid Simulations:
Particle Tracking: Utilize OpenCV to track and manipulate particles in fluid simulations for more realistic visual effects.
Motion Analysis:
Optical Flow: Implement optical flow algorithms to analyze motion patterns in footage, useful for creating dynamic VFX elements that follow the motion of objects.
Virtual Set Extension:
Camera Projection: Use camera calibration techniques to project virtual environments onto physical sets, extending the visual scope of a scene.
Color Grading:
Color Correction: Implement custom color grading algorithms to match the color tones and moods of different shots.
Automated QC (Quality Control):
Artifact Detection: Develop Python scripts to automatically detect and flag visual artifacts like noise, flicker, or compression artifacts in rendered frames.
Data Analysis and Visualization:
Performance Metrics: Use Python to analyze rendering times and optimize the rendering process.
Data Visualization: Generate graphs and charts to visualize render farm usage, project progress, and resource allocation.
Automating Repetitive Tasks:
Batch Processing: Automate repetitive tasks like resizing images, applying filters, or converting file formats across multiple shots.
Machine Learning Integration:
Object Detection: Integrate machine learning models (using frameworks like TensorFlow or PyTorch) to detect and track specific objects or elements within scenes.
Pipeline Integration:
Custom Tools: Develop Python scripts and tools to integrate OpenCV-based processes seamlessly into the studio’s pipeline.
Real-time Visualization:
Live Previsualization: Implement real-time OpenCV-based visualizations to aid decision-making during the preproduction stage.
VR and AR Integration:
Augmented Reality: Use Python and OpenCV to integrate virtual elements into real-world footage, creating compelling AR experiences.
Camera Effects:
Lens Distortion: Correct lens distortions and apply various camera effects using OpenCV, contributing to the desired visual style.
Interpolating frames from an EXR sequence using OpenCV can be useful when you have only every second frame of a final render and you want to create smoother motion by generating intermediate frames. However, keep in mind that interpolating frames might not always yield perfect results, especially if there are complex changes between frames. Here’s a basic example of how you might use OpenCV to achieve this:
import cv2
import numpy as np
import os

# Replace with the path to your EXR frames
exr_folder = "path_to_exr_frames"

# Replace with the appropriate frame extension and naming convention
frame_template = "frame_{:04d}.exr"

# Define the range of frame numbers you have
start_frame = 1
end_frame = 100
step = 2

# Define the output folder for interpolated frames
output_folder = "output_interpolated_frames"
os.makedirs(output_folder, exist_ok=True)

# Loop through the frame range and interpolate
for frame_num in range(start_frame, end_frame + 1, step):
    frame_path = os.path.join(exr_folder, frame_template.format(frame_num))
    next_frame_path = os.path.join(exr_folder, frame_template.format(frame_num + step))

    if os.path.exists(frame_path) and os.path.exists(next_frame_path):
        frame = cv2.imread(frame_path, cv2.IMREAD_ANYDEPTH | cv2.IMREAD_COLOR)
        next_frame = cv2.imread(next_frame_path, cv2.IMREAD_ANYDEPTH | cv2.IMREAD_COLOR)

        # Interpolate frames using simple averaging
        interpolated_frame = (frame + next_frame) / 2

        # Save interpolated frame
        output_path = os.path.join(output_folder, frame_template.format(frame_num))
        cv2.imwrite(output_path, interpolated_frame)

        print(f"Interpolated frame {frame_num}") # alternatively: print("Interpolated frame {}".format(frame_num))
Please note the following points:
The above example uses simple averaging to interpolate frames. More advanced interpolation methods might provide better results, such as motion-based algorithms like optical flow-based interpolation.
EXR files can store high dynamic range (HDR) data, so make sure to use cv2.IMREAD_ANYDEPTH flag when reading these files.
OpenCV might not support EXR format directly. You might need to use a library like exr to read and manipulate EXR files, and then convert them to OpenCV-compatible formats.
Consider the characteristics of your specific render when using interpolation. If there are large changes between frames, the interpolation might lead to artifacts.
Experiment with different interpolation methods and parameters to achieve the desired result.
For a more advanced and accurate interpolation, you might need to implement or use existing algorithms that take into account motion estimation and compensation.
import GafferScene
import Gaffer

# return a list of selections
# (nodes HAVE TO BE selected for the following)
sel = root.selection() # gaffer standard set

list(sel)
sel[0].typeName()
dir( sel[0] )
sel[0].getName()
sel.clear()
root.removeChild( sel[0] )

# store the selected nodes in a variable
>>> sel = root.selection()
>>> myGroup = sel[0]
>>> light = sel[1]

# set location name
myGroup['name'].setValue('groupLocation')
light['name'].setValue('photometricLightLocation')
# connect a node to a group
>>> myGroup['in'][0].setInput( light['out'] )

# return the node/port attached to a group port
>>> myGroup['in'][0].childNames('/')
photometricLightLocation

>>> myGroup['in'][0].getInput().fullName()
>>> myGroup['in'][0].source().fullName()
gui.scripts.ScriptNode.lighting_in1.PhotometricLightNode.out

# return the full name of one of the objects
# attached to the out port
>>> light['out'].outputs()[0].fullName()
gui.scripts.ScriptNode.lighting_in1.GroupNode.in.in0

>>> light
GafferArnold.ArnoldLight( "PhotometricLightNode" )

>>> light['out'].childNames('')
photometricLightLocation

>>> light['out'].outputs()[0].node()
GafferScene.Group( "Group" )
Learn how to do back end web development using the popular Python Django framework. You’ll build data visualization web apps using Pandas dataframes, Matplotlib, and Seaborn. You’ll also work with PDF rendering and even base-64 encoding. (7 hour YouTube course)
Visual Studio Code is a lightweight but powerful source code editor which runs on your desktop and is available for Windows, macOS and Linux. It comes with built-in support for JavaScript, TypeScript and Node.js and has a rich ecosystem of extensions for other languages (such as C++, C#, Java, Python, PHP, Go) and runtimes (such as .NET and Unity).
DISCLAIMER – Links and images on this website may be protected by the respective owners’ copyright. All data submitted by users through this site shall be treated as freely available to share.