Views : 718


3Dprinting (176) A.I. (761) animation (340) blender (197) colour (229) commercials (49) composition (152) cool (360) design (636) Featured (69) hardware (308) IOS (109) jokes (134) lighting (282) modeling (131) music (186) photogrammetry (178) photography (751) production (1254) python (87) quotes (491) reference (310) software (1336) trailers (297) ves (538) VR (219)

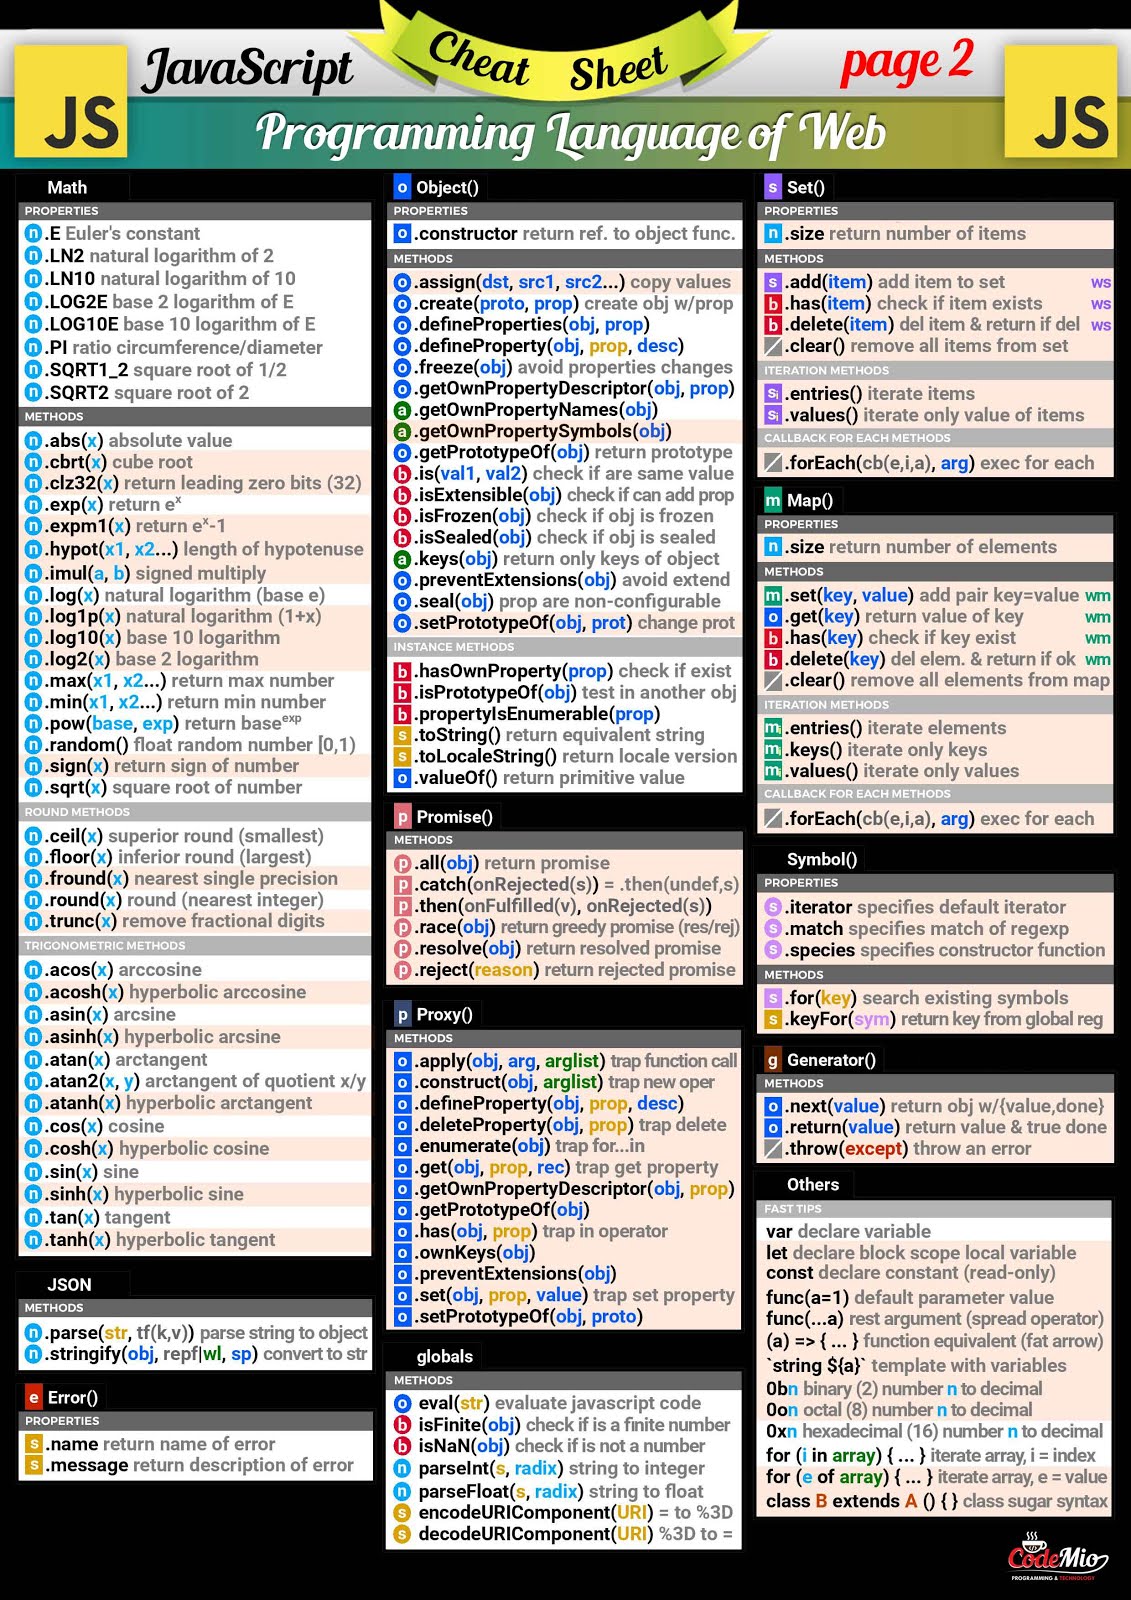
Javascript VS Python
https://www.freecodecamp.org/news/python-vs-javascript-what-are-the-key-differences-between-the-two-popular-programming-languages/
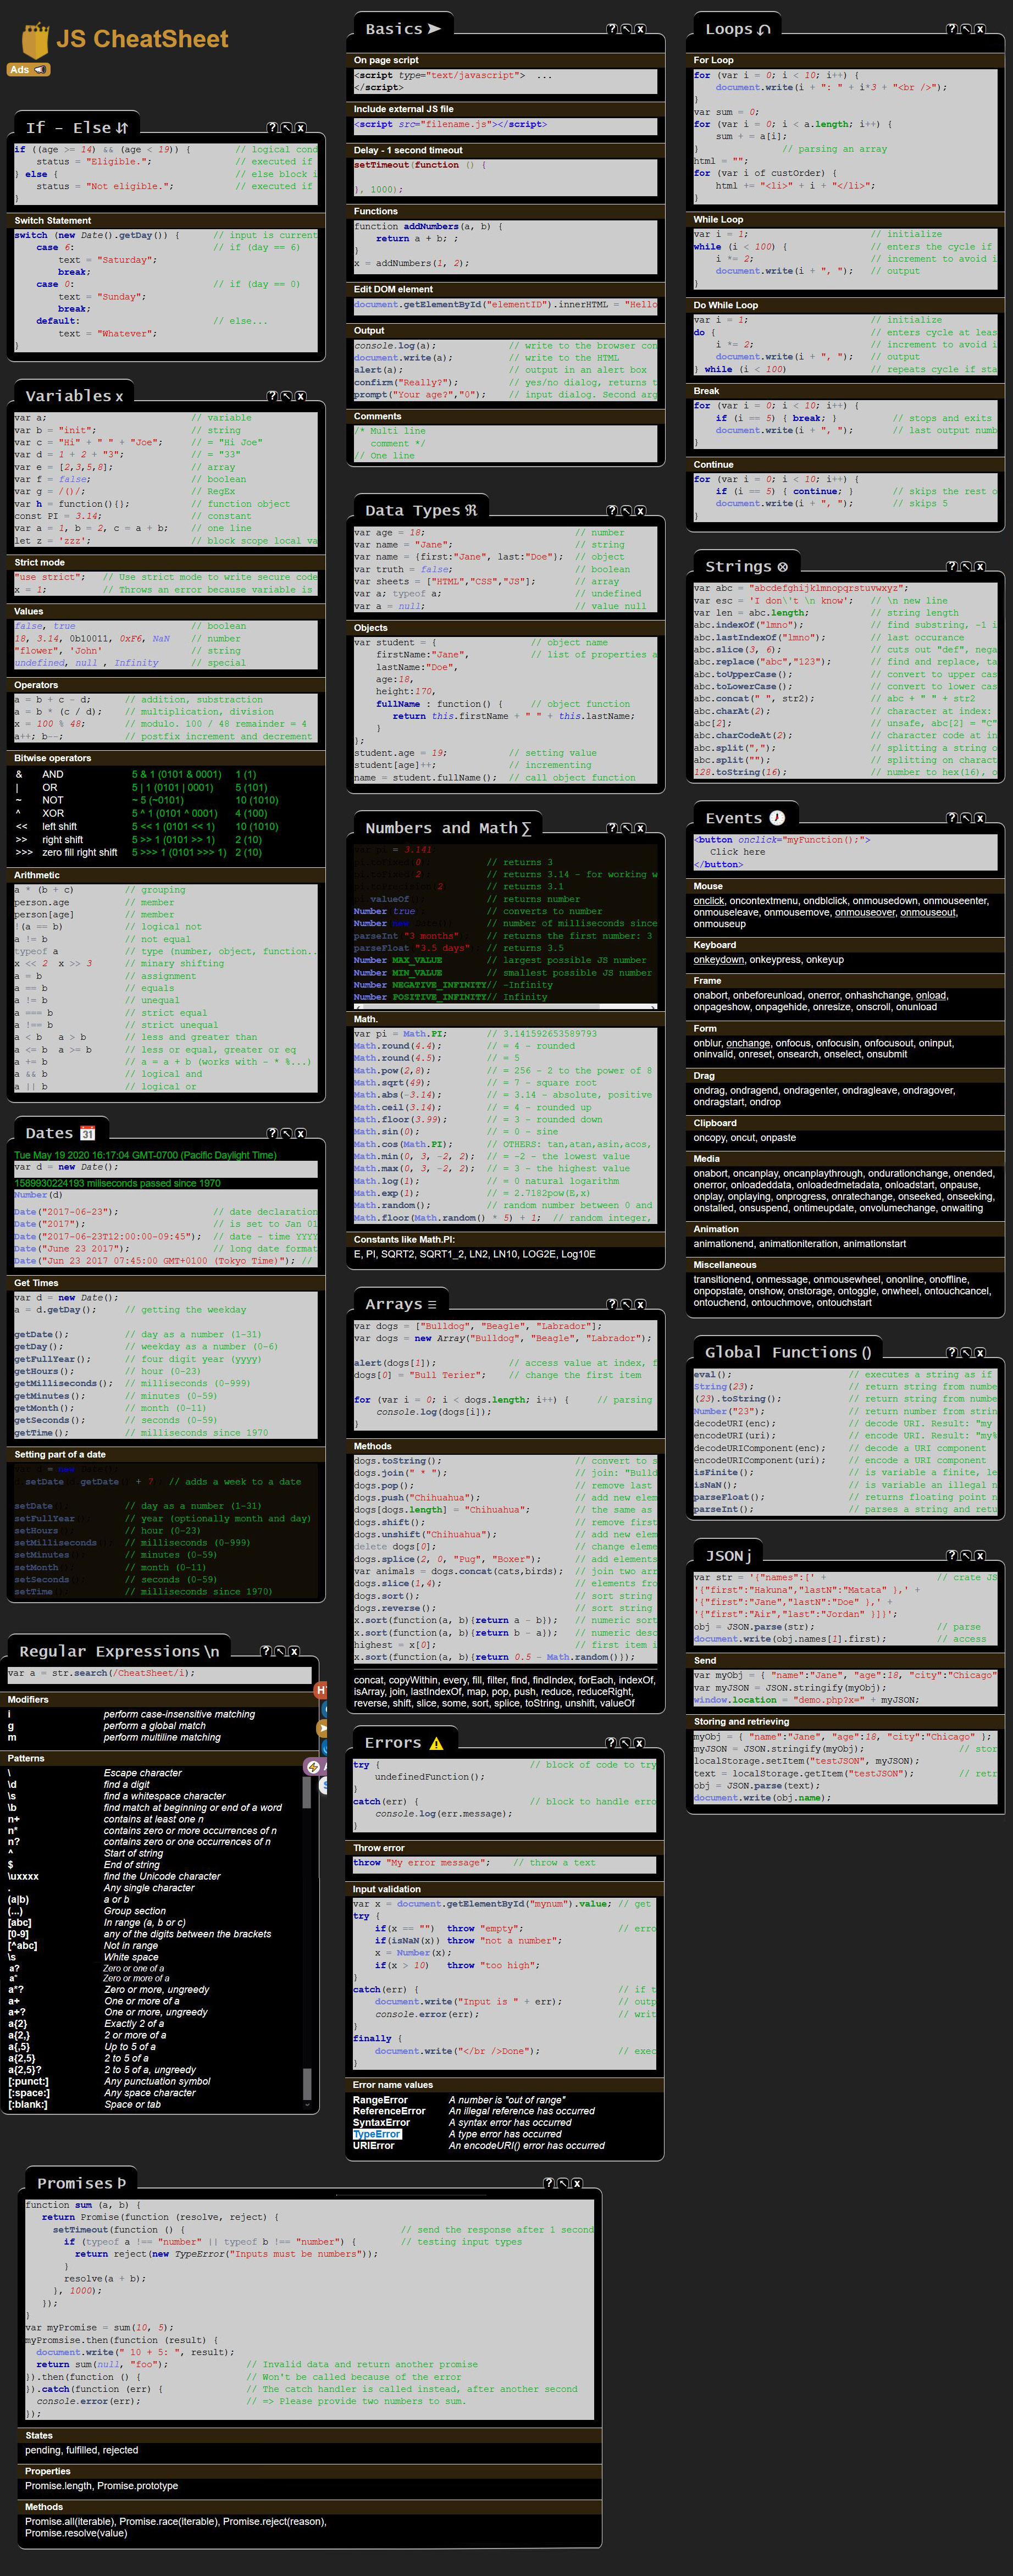
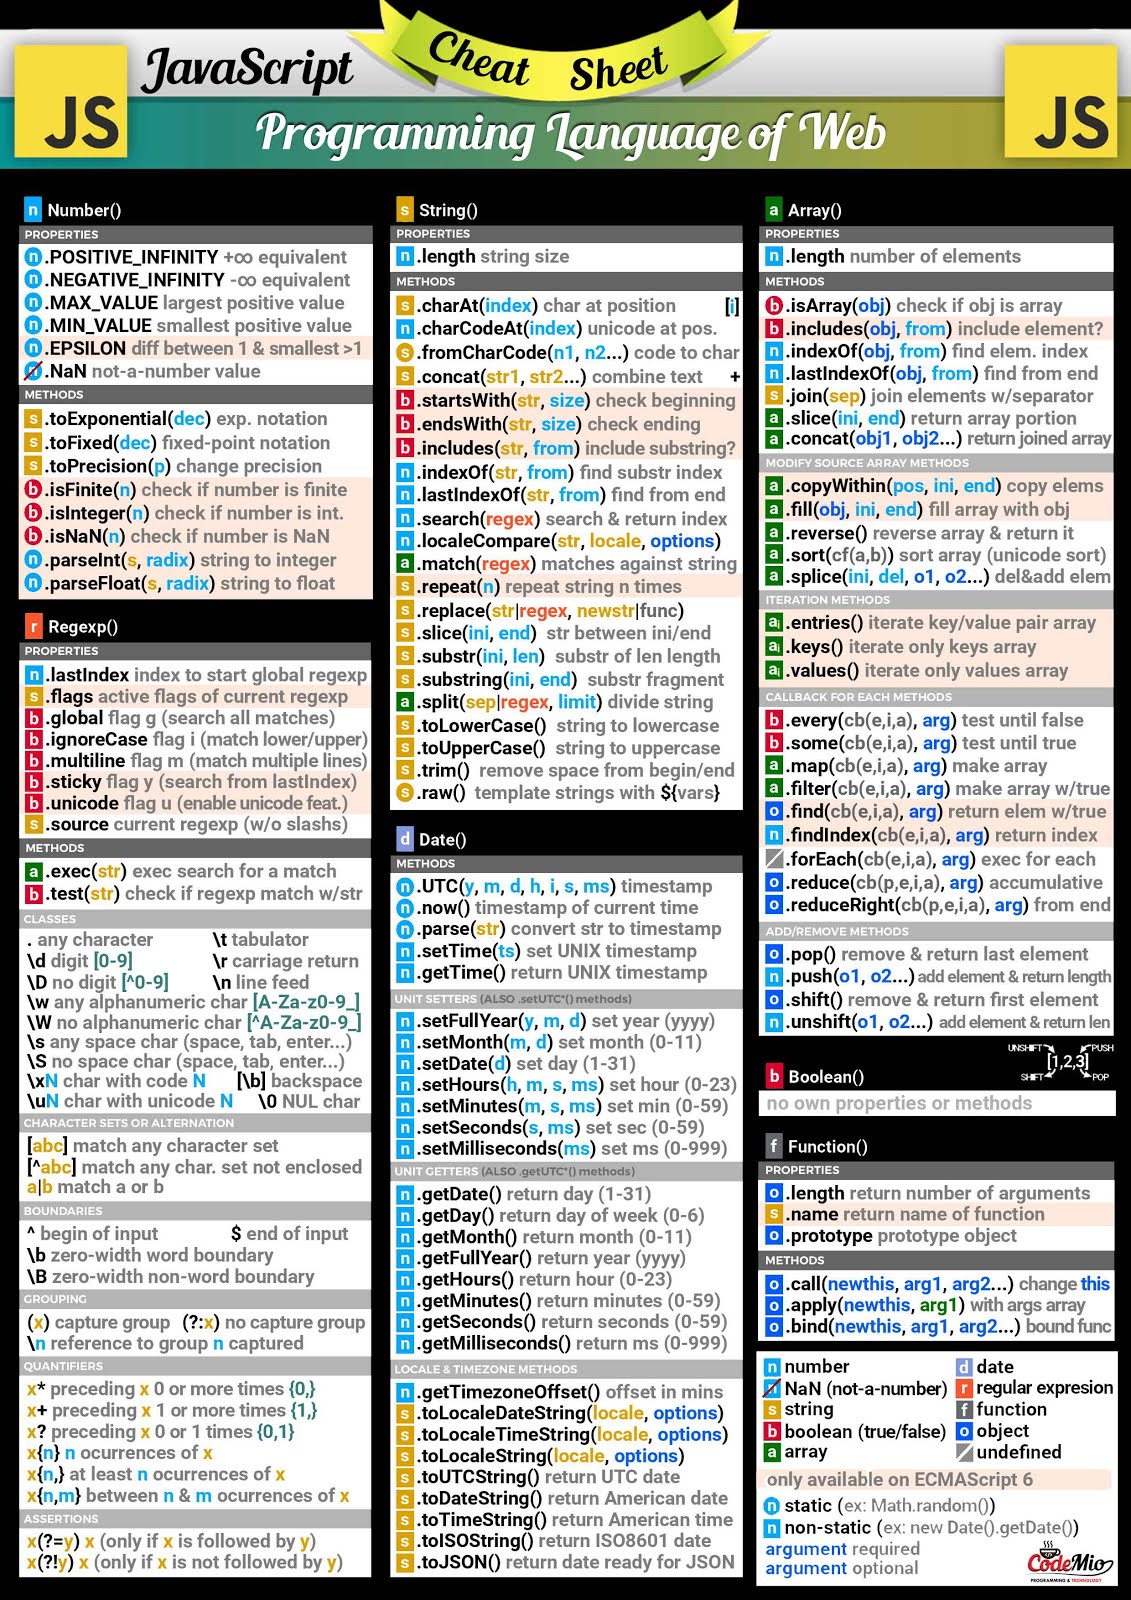
Built in functions
https://developer.mozilla.org/en-US/docs/Web/JavaScript/Reference
https://htmlcheatsheet.com/js/
www.digitalocean.com/community/tutorial_series/how-to-code-in-javascript
www.codecademy.com/catalog/language/javascript
https://websitesetup.org/wp-content/uploads/2018/04/wsu-js-cheat-sheet.pdf
https://ilovecoding.org/blog/js-cheatsheet
https://javascriptobfuscator.com/Javascript-Obfuscator.aspx
https://htmlcheatsheet.com/js/
https://www.freecodecamp.org/news/how-to-manipulate-the-dom-beginners-guide/
https://www.kickstarter.com/projects/photonlms/photon-light-module-system
monkeylearn.com/keyword-extraction/
Keyword extraction is the automated process of extracting the most relevant words and expressions from text.
https://azure.microsoft.com/en-us/services/cognitive-services/text-analytics/
StratusCore will provide the following to VES members:
– 40 hours of Virtual Workstation use per month
– 25 render credits per month
– 50 GB of hot storage
– 50% off all purchases

www.ibc.org/create-and-produce/re-animators-night-of-the-living-avatars/5504.article
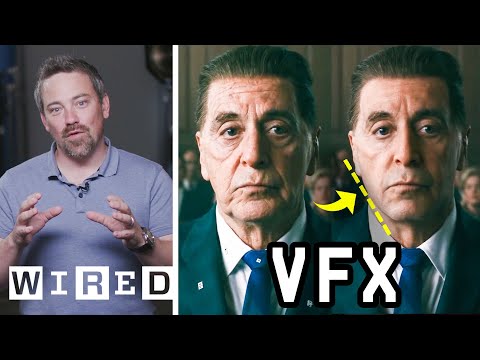
“When your performance is captured as data it can be manipulated, reworked or sampled, much like the music industry samples vocals and beats. If we can do that then where does the intellectual property lie? Who owns authorship of the performance? Where are the boundaries?”
“Tracking use of an original data captured performance is tricky given that any character or creature you can imagine can be animated using the artist’s work as a base.”
“Conventionally, when an actor contracts with a studio they will assign rights to their performance in that production to the studio. Typically, that would also licence the producer to use the actor’s likeness in related uses, such as marketing materials, or video games.
Similarly, a digital avatar will be owned by the commissioners of the work who will buy out the actor’s performance for that role and ultimately own the IP.
However, in UK law there is no such thing as an ‘image right’ or ‘personality right’ because there is no legal process in the UK which protects the Intellectual Property Rights that identify an image or personality.
The only way in which a pure image right can be protected in the UK is under the Law of Passing-Off.”
“Whether a certain project is ethical or not depends mainly on the purpose of using the ‘face’ of the dead actor,” “Legally, when an actor dies, the rights of their [image/name/brand] are controlled through their estate, which is often managed by family members. This can mean that different people have contradictory ideas about what is and what isn’t appropriate.”
“The advance of performance capture and VFX techniques can be liberating for much of the acting community. In theory, they would be cast on talent alone, rather than defined by how they look.”
“The question is whether that is ethically right.”
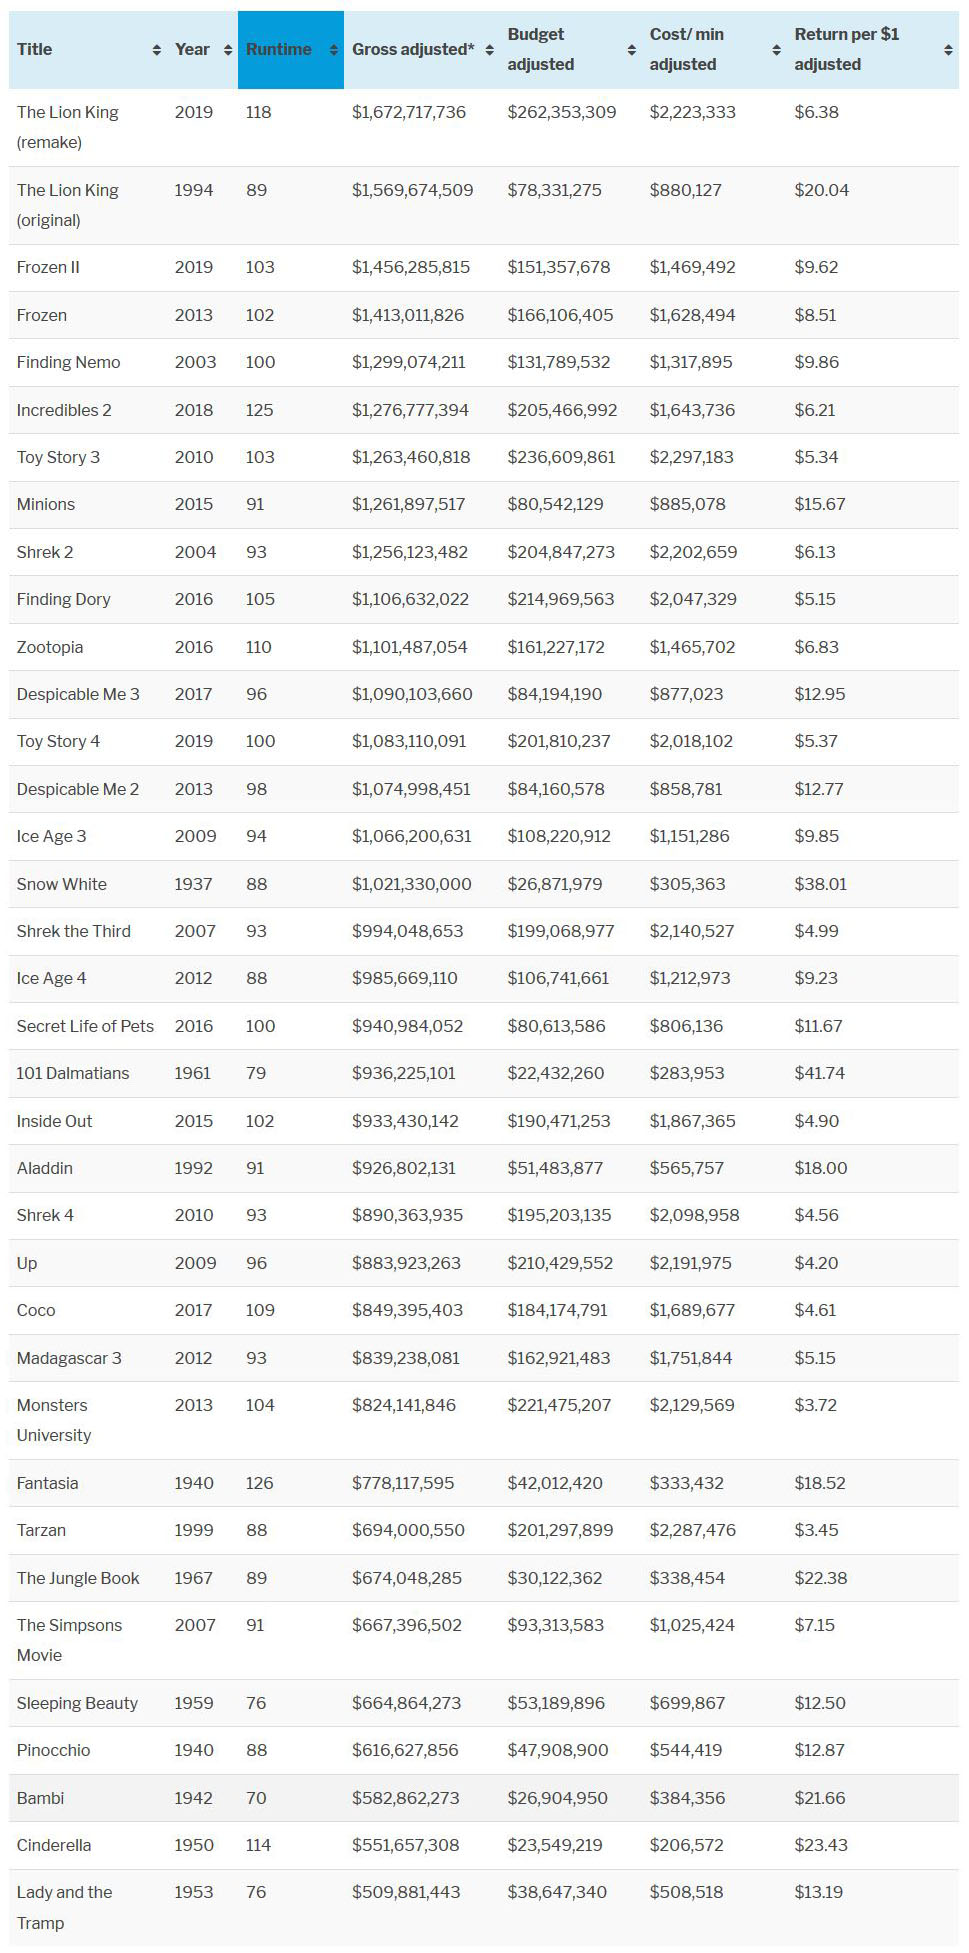
getwrightonit.com/animation-price-guide/
“Estimate the cost of animation projects for different mediums, styles, quality and duration using our interactive instant animation price calculator. Use this price guide to calculate a ballpark figure for your next animation project.”
getwrightonit.com/animation-cost-per-minute-inflation-adjusted/
“The cost per minute to produce the traditionally animated films from the 1930s – 1960 was much lower than today even when adjusted for inflation. This is likely due to low paid animators pulling excessive unpaid overtime, including an army of women in the Ink and Paint department who barely made enough money to cover the rent.”
“Overall, animation is a high cost and labor intensive way to get a story to the screen, but there are big returns to be made, particularly with re-releases as a new generation of young audience members discover the films.”
https://www.cg-wire.com/en/kitsu
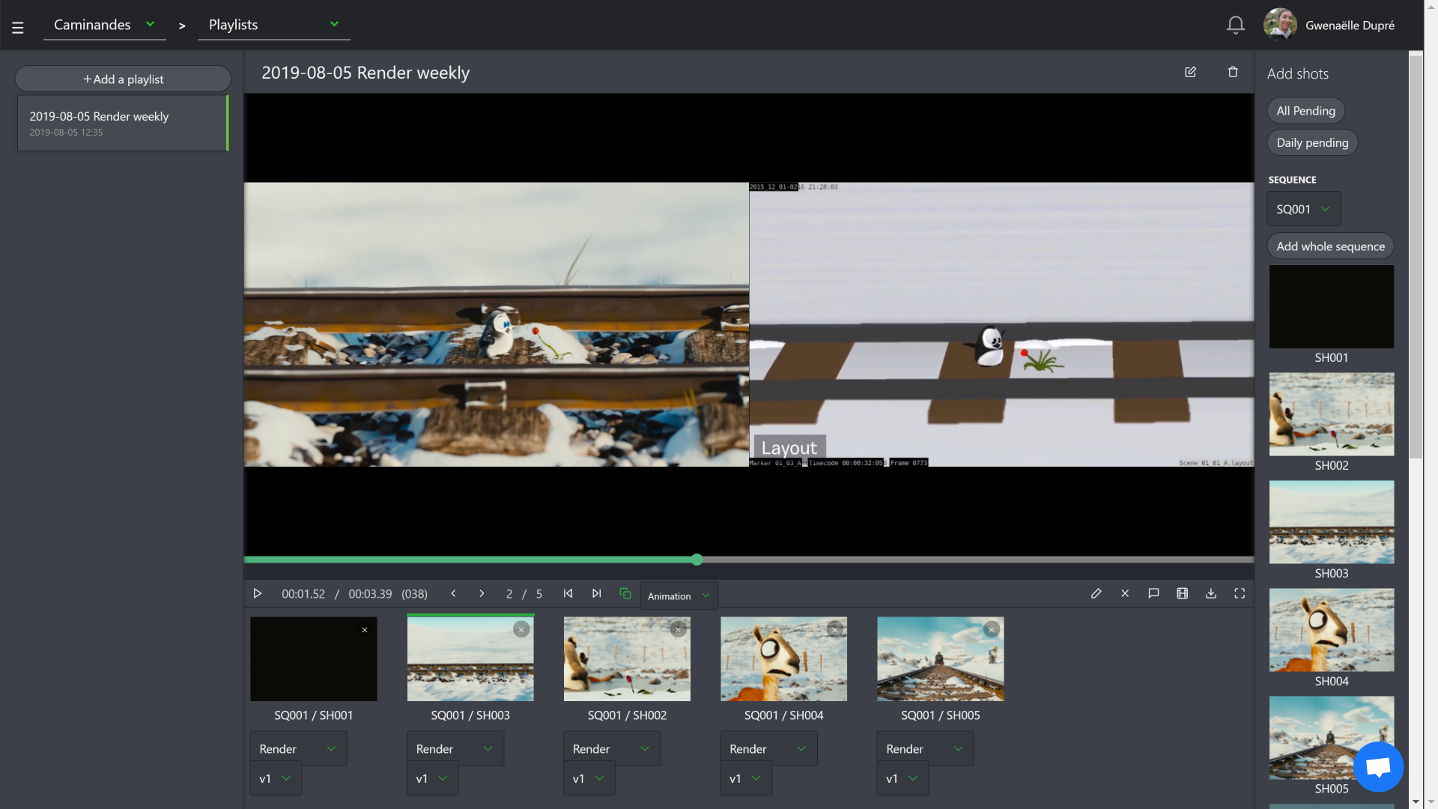
Kitsu is a web application to track the progress of your productions. It improves the communication between all stakeholders of the production. Which leads to better pictures and faster deliveries.
CGWire PRESS RELEASE
“We noticed that a good way to improve the quality of CG movies is to improve the communication inside the studio. That’s why we made a software that is easy to use. All the stakeholders of the production can add and get data efficiently. Everyone is better informed and take better decisions.
The most notable features of Kitsu are:
– The listing of all elements of the production: assets, shots and tasks.
– A powerful commenting system that allows to put notes on tasks while changing status and attaching previews.
– A playlist system to view, compare, annotate and comment shots in a row. It’s super easy for the director to perform his reviews.
– A news feed to know in real-time what is happening during the production.
– Quota tables to evaluate the productiviy of the studio.
Aside of that we added other tools to simplify the daily usage : timesheets, scheduling, production statistics, Slack integration and casting management.
Kitsu Today CGWire is deployed in 25 studios. Most of them are split in different locations. So, our users are spread in more than 15 countries working on production of all kinds: TV series, feature films and short movies (our customers are Cube Creative, TNZPV, Miyu, Akami, Lee Film, etc.). Once shipped, all productions tracked with Kitsu met success by receiving awards or getting millions of views on Youtube or on TV.
Another good thing is that Animation Schools really enjoy our product, 10 of them are using Kitsu to manage their end of studies projects (Les Gobelins, Ecole des Nouvelles Images, LISAA, etc.).
Our goal in 2020 is to make the ingestion process even better with a stronger import system, software integration and production templates. With these features, we want to be the reference software for building animation productions, especially for TV series.”


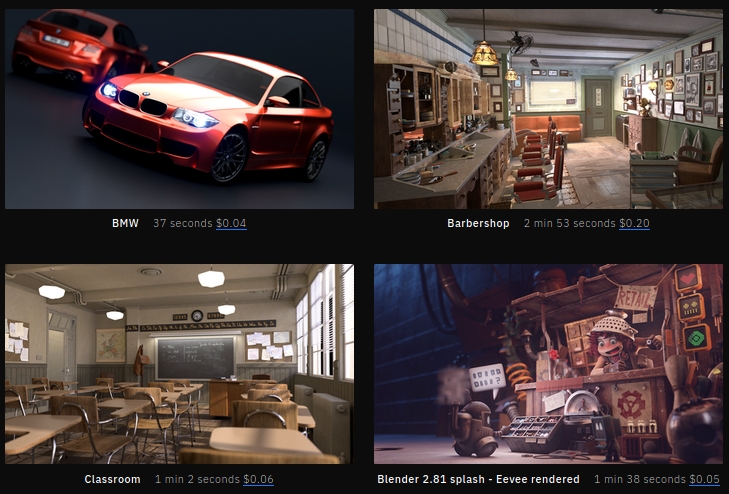
Concierge Render allows you to render animations in parallel on up to 64 nodes, harnessing the power of over 500 GPUs per job at prices as low as $0.35 per GPU per hour. Eeve’s at $2 per server per hour, up to 48 servers per hour.
With over 40,000 GPUs available, Concierge Render can meet most projects’ size and deadlines.
All frames are processed simultaneously. Up to 520 GPUs will process each project with unprecedented speed. Still images are processed on multi-GPU servers and animations are rendered over a proprietary distributed GPU network.
Concierge Render offers a system with zero queue so a project starts rendering immediately.
en.wikipedia.org/wiki/Go_motion
Petroleum jelly
This crude but reasonably effective technique involves smearing petroleum jelly (“Vaseline”) on a plate of glass in front of the camera lens, also known as vaselensing, then cleaning and reapplying it after each shot — a time-consuming process, but one which creates a blur around the model. This technique was used for the endoskeleton in The Terminator. This process was also employed by Jim Danforth to blur the pterodactyl’s wings in Hammer Films’ When Dinosaurs Ruled the Earth, and by Randal William Cook on the terror dogs sequence in Ghostbusters.[citation needed]
Bumping the puppet
Gently bumping or flicking the puppet before taking the frame will produce a slight blur; however, care must be taken when doing this that the puppet does not move too much or that one does not bump or move props or set pieces.
Moving the table
Moving the table on which the model is standing while the film is being exposed creates a slight, realistic blur. This technique was developed by Ladislas Starevich: when the characters ran, he moved the set in the opposite direction. This is seen in The Little Parade when the ballerina is chased by the devil. Starevich also used this technique on his films The Eyes of the Dragon, The Magical Clock and The Mascot. Aardman Animations used this for the train chase in The Wrong Trousers and again during the lorry chase in A Close Shave. In both cases the cameras were moved physically during a 1-2 second exposure. The technique was revived for the full-length Wallace & Gromit: The Curse of the Were-Rabbit.
Go motion
The most sophisticated technique was originally developed for the film The Empire Strikes Back and used for some shots of the tauntauns and was later used on films like Dragonslayer and is quite different from traditional stop motion. The model is essentially a rod puppet. The rods are attached to motors which are linked to a computer that can record the movements as the model is traditionally animated. When enough movements have been made, the model is reset to its original position, the camera rolls and the model is moved across the table. Because the model is moving during shots, motion blur is created.
A variation of go motion was used in E.T. the Extra-Terrestrial to partially animate the children on their bicycles.
Real-World Measurements for Call of Duty: Advanced Warfare
www.activision.com/cdn/research/Real_World_Measurements_for_Call_of_Duty_Advanced_Warfare.pdf
Local version
Real_World_Measurements_for_Call_of_Duty_Advanced_Warfare.pdf

A light wave that is vibrating in more than one plane is referred to as unpolarized light. …
Polarized light waves are light waves in which the vibrations occur in a single plane. The process of transforming unpolarized light into polarized light is known as polarization.

en.wikipedia.org/wiki/Polarizing_filter_(photography)
The most common use of polarized technology is to reduce lighting complexity on the subject.
Details such as glare and hard edges are not removed, but greatly reduced.
This method is usually used in VFX to capture raw images with the least amount of specular diffusion or pollution, thus allowing artists to infer detail back through typical shading and rendering techniques and on demand.
Light reflected from a non-metallic surface becomes polarized; this effect is maximum at Brewster’s angle, about 56° from the vertical for common glass.
A polarizer rotated to pass only light polarized in the direction perpendicular to the reflected light will absorb much of it. This absorption allows glare reflected from, for example, a body of water or a road to be reduced. Reflections from shiny surfaces (e.g. vegetation, sweaty skin, water surfaces, glass) are also reduced. This allows the natural color and detail of what is beneath to come through. Reflections from a window into a dark interior can be much reduced, allowing it to be seen through. (The same effects are available for vision by using polarizing sunglasses.)

www.physicsclassroom.com/class/light/u12l1e.cfm
Some of the light coming from the sky is polarized (bees use this phenomenon for navigation). The electrons in the air molecules cause a scattering of sunlight in all directions. This explains why the sky is not dark during the day. But when looked at from the sides, the light emitted from a specific electron is totally polarized.[3] Hence, a picture taken in a direction at 90 degrees from the sun can take advantage of this polarization.

Use of a polarizing filter, in the correct direction, will filter out the polarized component of skylight, darkening the sky; the landscape below it, and clouds, will be less affected, giving a photograph with a darker and more dramatic sky, and emphasizing the clouds.

There are two types of polarizing filters readily available, linear and “circular”, which have exactly the same effect photographically. But the metering and auto-focus sensors in certain cameras, including virtually all auto-focus SLRs, will not work properly with linear polarizers because the beam splitters used to split off the light for focusing and metering are polarization-dependent.
Polarizing filters reduce the light passed through to the film or sensor by about one to three stops (2–8×) depending on how much of the light is polarized at the filter angle selected. Auto-exposure cameras will adjust for this by widening the aperture, lengthening the time the shutter is open, and/or increasing the ASA/ISO speed of the camera.
www.adorama.com/alc/nd-filter-vs-polarizer-what%25e2%2580%2599s-the-difference
Neutral Density (ND) filters help control image exposure by reducing the light that enters the camera so that you can have more control of your depth of field and shutter speed. Polarizers or polarizing filters work in a similar way, but the difference is that they selectively let light waves of a certain polarization pass through. This effect helps create more vivid colors in an image, as well as manage glare and reflections from water surfaces. Both are regarded as some of the best filters for landscape and travel photography as they reduce the dynamic range in high-contrast images, thus enabling photographers to capture more realistic and dramatic sceneries.
shopfelixgray.com/blog/polarized-vs-non-polarized-sunglasses/
www.eyebuydirect.com/blog/difference-polarized-nonpolarized-sunglasses/

Building a Portable PBR Texture Scanner by Stephane Lb
http://rtgfx.com/pbr-texture-scanner/


How To Split Specular And Diffuse In Real Images, by John Hable
http://filmicworlds.com/blog/how-to-split-specular-and-diffuse-in-real-images/
Capturing albedo using a Spectralon
https://www.activision.com/cdn/research/Real_World_Measurements_for_Call_of_Duty_Advanced_Warfare.pdf
Real_World_Measurements_for_Call_of_Duty_Advanced_Warfare.pdf
Spectralon is a teflon-based pressed powderthat comes closest to being a pure Lambertian diffuse material that reflects 100% of all light. If we take an HDR photograph of the Spectralon alongside the material to be measured, we can derive thediffuse albedo of that material.

The process to capture diffuse reflectance is very similar to the one outlined by Hable.
1. We put a linear polarizing filter in front of the camera lens and a second linear polarizing filterin front of a modeling light or a flash such that the two filters are oriented perpendicular to eachother, i.e. cross polarized.
2. We place Spectralon close to and parallel with the material we are capturing and take brack-eted shots of the setup7. Typically, we’ll take nine photographs, from -4EV to +4EV in 1EVincrements.
3. We convert the bracketed shots to a linear HDR image. We found that many HDR packagesdo not produce an HDR image in which the pixel values are linear. PTGui is an example of apackage which does generate a linear HDR image. At this point, because of the cross polarization,the image is one of surface diffuse response.
4. We open the file in Photoshop and normalize the image by color picking the Spectralon, filling anew layer with that color and setting that layer to “Divide”. This sets the Spectralon to 1 in theimage. All other color values are relative to this so we can consider them as diffuse albedo.

amasci.com/amateur/holohint.html#0
Each surface scratch acts as a bent mirror and reflects sunlight. Each reflection looks like a small white highlight on the shiny scratch. Each of your eyes sees a DIFFERENT REFLECTION. Your brain thinks the two different reflections are really one white dot located deep behind the scratch. It’s like a “viewmaster” stereo viewer.
COLLECTIONS
| Featured AI
| Design And Composition
| Explore posts
POPULAR SEARCHES
unreal | pipeline | virtual production | free | learn | photoshop | 360 | macro | google | nvidia | resolution | open source | hdri | real-time | photography basics | nuke
FEATURED POSTS
Social Links
DISCLAIMER – Links and images on this website may be protected by the respective owners’ copyright. All data submitted by users through this site shall be treated as freely available to share.